| Week |
Focus |
Outcome |
| 1 to 2 |
Install Linux, learn the terminal and directory structure |
Comfortable using the CLI daily |
| 3 to 5 |
Permissions, ownership, mount points, manual partitioning |
Understand access control and storage basics |
| 6 |
Package management on Ubuntu and Rocky Linux |
Can install and remove software confidently |
| 7 to 8 |
User and group administration |
Can create and manage real user accounts |
| 9 |
LVM and basic RAID awareness |
Can create and extend storage volumes |
| 10 to 11 |
Systemd, services, and the boot process |
Can manage and troubleshoot services |
| 12 to 13 |
Networking basics and SSH hardening |
Secure remote access set up correctly |
| 14 to 15 |
Bash scripting fundamentals |
Can write a working script with logic |
| 16 to 17 |
Cron, scheduling, and provisioning basics |
Can automate a real, repeated task |
| 18 to 21 |
SELinux or AppArmor, firewalls |
Can configure and audit security controls |
| 22 |
Log-based troubleshooting |
Can diagnose failures using logs alone |
| 23 to 25 |
Monitoring and backup strategy |
Have a tested backup and restore process |
| 26 to 27 |
Container basics, Docker and Podman |
Can run and monitor a container workload |
| 28 to 30 |
Production Linux Administration |
Deploy and maintain a real, hardened server |
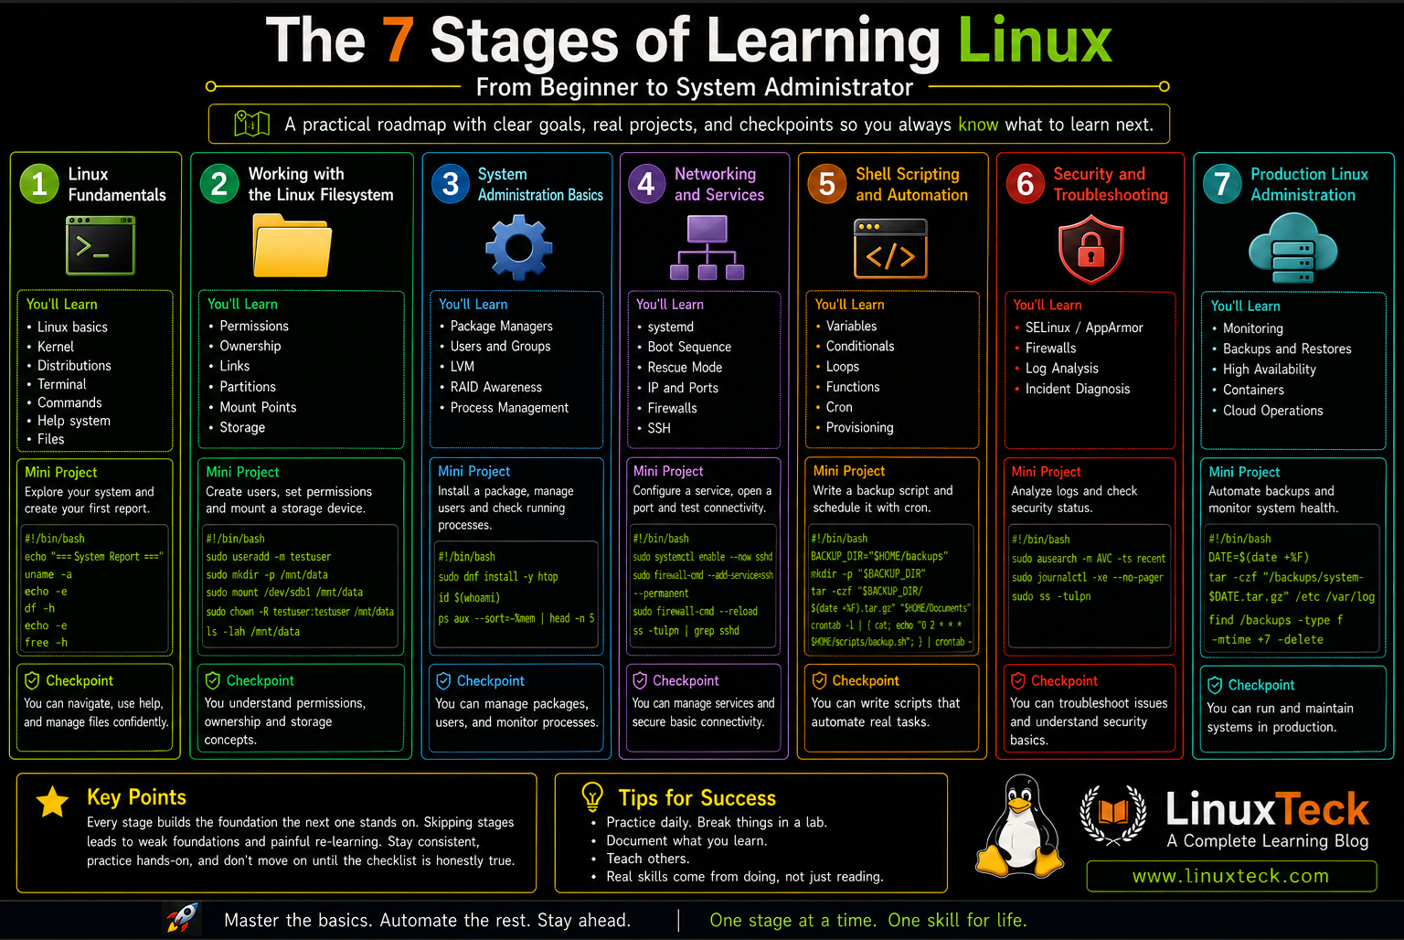
Stage 1: Linux Fundamentals
Goal
Get comfortable existing inside a Linux system without fear. By the end of this stage, a terminal should feel like a normal place to be, not an intimidating black box.
Why This Stage Matters
Every later stage assumes this comfort already exists. Tutorials that jump straight into system administration are quietly assuming you can already navigate a filesystem and read documentation without help. If that assumption isn't true yet, every later stage will feel harder than it actually is, not because the material is difficult, but because you're fighting the terminal itself at the same time.
What You Should Learn
- ✓ What Linux actually is. Linux is a kernel, not an operating system by itself. A distribution, or distro, packages that kernel with software and tools into something usable. Understanding this early prevents a lot of confusion later about why Ubuntu and Rocky Linux feel so different despite both being "Linux."
- ✓ Choosing a starting distro. Ubuntu is the most common starting point because of its enormous community and tutorial base. This choice does not lock you in. Almost everything you learn in stages 1 and 2 transfers directly to any other distro.
- ✓ The terminal as home base. The shell is the program that reads your commands and runs them. Relying on a graphical file manager instead of the terminal will quietly slow every later stage, since production servers rarely have a GUI at all.
- ✓ Directory structure. Learn what actually lives in
/home, /etc, /var, /usr, and /bin, and why that structure is consistent across almost every distro. This is the map you'll use for the rest of your Linux life.
- ✓ Basic file operations.
ls, cd, pwd, cp, mv, rm, and mkdir are the verbs of navigation. Learn what each one actually does to a file, not just the syntax.
- ✓ The help system.
man pages and --help exist so you never have to memorize a command's full option list. Learning to read one properly is worth more than memorizing fifty flags.
Skill Tree
Stage 1: Linux Fundamentals
├── Linux
├── Kernel
├── Distros
├── Terminal
├── Commands
├── Help System
└── Files
Career Tip:
Recruiters and hiring managers care far more about whether you can navigate a real system confidently than which distro logo is on your resume. Don't waste this stage agonizing over "the best distro," spend it building comfort instead.
Hands-on Practice
Install a Linux virtual machine and spend at least one full day using only the terminal, no GUI file manager. Create a folder structure by hand, move files between directories, copy and rename files, delete a folder tree safely, and read the man page for at least five commands before you use them for the first time.
Run these three commands in order to confirm you can orient yourself and read documentation without outside help.
# Where am I, what is here
pwd
ls -la
# Read the manual instead of guessing at flags
man ls
You should see your current directory path, a full listing including hidden files, and then a scrollable manual page for ls that you can exit by pressing q.
Mini Project
Create your first Linux virtual machine. Install Ubuntu in VirtualBox, boot it successfully, and complete every task in the hands-on practice above using only the terminal for an entire session, no GUI shortcuts allowed.
Common Mistakes
Copying commands from tutorials without understanding what each flag does. Avoiding the terminal in favor of GUI tools whenever possible. Skipping man pages entirely and searching the web for every small question instead. Not knowing which distro is actually installed or why it matters.
Do's
Read the man page before running an unfamiliar command for the first time. Take notes in your own words instead of copying tutorial text. Practice daily, even if it's only twenty minutes.
Don'ts
Don't install five different distros in one week trying to find "the best one," that decision matters far less at this stage than consistent practice. Don't jump ahead to scripting before this stage feels comfortable.
Don't Learn This Yet:
❌ Docker, ❌ Kubernetes, ❌ Terraform, ❌ Ansible. None of these matter yet. Focus only on mastering stage 1 first.
Interview Readiness
By the end of this stage, you should be able to answer:
- ✓ What is the difference between Linux and a Linux distribution?
- ✓ What is the Linux directory structure and what lives in
/etc versus /var?
- ✓ How do you find documentation for a command you've never used?
Ready for the Next Stage?
- ✓ I can navigate a Linux filesystem without a GUI file manager
- ✓ I can create, move, copy, and delete files confidently
- ✓ I know what a man page is and have actually used one
- ✓ I understand the difference between a distro and the Linux kernel
Milestone Badge: Linux Explorer:
Completing this stage honestly earns you the Linux Explorer badge. You can exist inside a Linux system without fear, which is the real, unglamorous foundation everything else in this roadmap is built on.
What Success Looks Like: if you've completed everything in this stage, you should now be able to install Linux, navigate the filesystem confidently, work entirely from the terminal, and explain the difference between Linux and a Linux distribution to someone else in plain language.
Estimated Time
1 to 2 weeks with daily practice.
LinuxTeck Recommended Reading
Linux Fundamentals, Linux Commands for Beginners, Basic Linux Commands, Best Linux Distro for Beginners, and Installing Ubuntu 24.04 LTS Step by Step.
Stage 2: Working with the Linux Filesystem
Goal
Understand ownership, permissions, and basic storage well enough that "permission denied" stops feeling random and starts being something you can explain.
Why This Stage Matters
Every later stage quietly assumes this knowledge. Package installs write files with specific ownership. Services run as specific users. Scripts fail when they try to write somewhere they shouldn't. Skipping this stage doesn't remove the need for it, it just delays the confusion to a moment when you're also trying to learn something else at the same time.
What You Should Learn
- ✓ Ownership. Every file has a user owner and a group owner. Understanding who owns what, and why, is the foundation everything else in this stage builds on.
- ✓ Permission bits. Read, write, and execute apply separately to the owner, the group, and everyone else. Learn both the symbolic form (
rwxr-xr-x) and the numeric form (755) since real systems use both interchangeably.
- ✓ chmod and chown. These are how you change permissions and ownership. Learn to predict what a change will do before you run it, not just how to run it.
- ✓ Mount points and manual partitioning. Understand what
/boot, /, and swap actually are, and what it means to partition a disk by hand during an install rather than accepting an automatic layout.
- ✓ Hard links versus symbolic links. A surprising number of confusing filesystem behaviors trace back to not understanding the difference.
- ✓ Checking disk usage.
df shows filesystem-level usage, du shows what's actually taking up space inside a directory. Knowing both prevents a lot of guessing later.
Skill Tree
Stage 2: Working with the Linux Filesystem
├── Permissions
├── Ownership
├── Links
├── Partitions
├── Mount Points
└── Storage
Remember:
Permissions feel tedious compared to scripting or containers. Push through anyway, this is the stage that quietly determines whether every later stage goes smoothly or turns into confusing, unrelated-looking errors.
Hands-on Practice
Change ownership of a test file, set several different permission combinations and predict the resulting behavior before testing it, create and activate a swap file, and use df -h and du -sh to find out what's actually consuming disk space on your practice system.
Run these commands to confirm your storage layout is what you expect, then practice changing ownership and permissions on a real file.
# Confirm partitions and swap are mounted correctly
df -h
swapon --show
# Change ownership and permissions, then verify
sudo chown alex:alex project.txt
chmod 640 project.txt
ls -la project.txt
The final ls -la should show alex as both the user and group owner, with permissions reading rw-r-----, confirming the owner can read and write while the group can only read and everyone else has no access at all.
Mini Project
Manage users and permissions. Create a shared project directory, add a second user to a common group, and configure permissions so both users can read and write files inside it while everyone else is locked out.
Common Mistakes
Using chmod 777 to "make it work" instead of understanding why access was denied in the first place. Confusing chmod with chown, they solve different problems. Using the recursive flag without checking what it will actually touch. Ignoring the difference between hard and symbolic links until something breaks unexpectedly.
Do's
Predict what a permission change will do before applying it, then verify with ls -la afterward. Learn the numeric permission system properly, it comes up constantly in real configuration files.
Don'ts
Don't use 777 as a permissions fix, it almost always creates a security problem instead of solving one. Don't edit /etc/fstab without understanding the syntax first, a bad entry there can stop a system from booting cleanly.
Don't Learn This Yet:
❌ Cloud infrastructure, ❌ Kubernetes storage, ❌ distributed filesystems. Finish local filesystem fundamentals first, everything at scale is built on these same permission concepts.
Interview Readiness
By the end of this stage, you should be able to answer:
- ✓ Explain Linux permissions in both symbolic and numeric form
- ✓ Explain what chmod and chown each actually do
- ✓ Explain the difference between hard links and symbolic links
- ✓ Explain what a mount point is and why swap matters
Ready for the Next Stage?
- ✓ I understand read, write, and execute for user, group, and other
- ✓ I can use chmod and chown confidently, in both symbolic and numeric form
- ✓ I know what a mount point is and can explain what swap does
- ✓ I can check disk usage without guessing where the space went
Milestone Badge: Filesystem Explorer:
You've earned the Filesystem Explorer badge. Permission errors will stop feeling mysterious from here forward, which is exactly the foundation stage 3's package and storage work depends on.
What Success Looks Like: if you've completed everything in this stage, you should be able to look at a permission denied error, form a specific hypothesis about why it's happening, and confirm or rule it out in under a minute using ls -la alone.
Estimated Time
2 to 3 weeks.
LinuxTeck Recommended Reading
Linux File System Fundamentals, chmod Command in Linux, chown Command Made Simple, Special Permissions in Linux, and Unix File System Guide.
Stage 3: System Administration Basics
Goal
Move from understanding Linux conceptually to actually running and maintaining a real system: packages, users, storage, and processes.
Why This Stage Matters
This is where "I understand how Linux works" becomes "I can keep a Linux system alive." Package management, user administration, and storage operations are the daily-driver skills of anyone who touches a server professionally, and they're also where Ubuntu and Rocky Linux genuinely start to diverge.
What You Should Learn
- ✓ Package managers. Ubuntu and the Debian family use
apt, Rocky Linux and the RHEL family use dnf. The philosophy behind each, repositories, dependency resolution, and update cadence, differs enough that this is a real skill to build twice.
- ✓ User and group administration.
useradd, usermod, passwd, and the difference between the sudo group on Ubuntu and the wheel group on Rocky Linux.
- ✓ LVM operations. Logical Volume Management lets you resize storage without rebuilding a system from scratch. Learn to create a physical volume, group it into a volume group, carve out a logical volume, and extend it later.
- ✓ Basic RAID awareness. Production storage is frequently RAID underneath LVM, not LVM alone. Knowing how to check
/proc/mdstat is a habit worth building now.
- ✓ Process management.
ps, top or htop, and kill let you see what's actually running on a system and stop something that shouldn't be.
Skill Tree
Stage 3: System Administration Basics
├── Package Managers
├── Users and Groups
├── LVM
├── RAID Awareness
└── Process Management
Pro Tip:
Practice the exact same task on both Ubuntu and Rocky Linux side by side wherever you can. Doing it twice, once with apt and once with dnf, cements the concept far faster than reading about the difference.
Hands-on Practice
Install and remove packages on both Ubuntu and Rocky Linux if you can access both. Create a new user and add them to the correct administrative group. Build an LVM logical volume from scratch, then extend it and grow the filesystem on top of it. Find a specific running process and stop it safely.
Run this checkpoint to confirm your storage layout is healthy, then practice the extend-and-resize sequence that trips up almost every beginner the first time.
# Storage and LVM layout, identical on both distros
lsblk
vgs
lvs
df -Th
# Extend a logical volume, then grow the filesystem on top
sudo lvextend -L +5G /dev/vg_data/lv_data
sudo resize2fs /dev/vg_data/lv_data
After the resize, df -Th should show the filesystem's available space increased by roughly the same amount you added with lvextend. If it didn't change, the resize step didn't actually run.
Rocky and RHEL default to XFS instead of ext4, which uses xfs_growfs in place of resize2fs, and takes a mount point rather than a device path. Forgetting to grow the filesystem after extending the volume is the single most common LVM mistake beginners make.
Mini Project
Host your first web server. Install and configure a basic web server, Apache or Nginx, and serve a simple page over HTTP. This project ties package management and service management together into something tangible you can see working in a browser.
Common Mistakes
Extending an LVM volume and forgetting to grow the filesystem on top of it. Installing packages without checking what dependencies they pull in. Granting sudo access without understanding the scope of trust that involves. Running services as root when a dedicated service account would be safer.
Do's
Check df -h after any storage change to confirm it actually took effect. Use groups and id to verify a user's permissions instead of assuming.
Don'ts
Don't leave package updates untouched for months, security patches accumulate risk quietly. Don't create test users with blank or weak passwords, even "just for practice" habits transfer to real systems later.
Don't Learn This Yet:
❌ Kubernetes storage classes, ❌ cloud object storage, ❌ distributed databases. Master local LVM and package management first, those concepts are the foundation everything at scale is built on.
Interview Readiness
By the end of this stage, you should be able to answer:
- ✓ Explain the difference between apt and dnf
- ✓ Explain what LVM is and why you'd extend a logical volume
- ✓ Explain the difference between the sudo group and the wheel group
- ✓ Explain how you'd find and safely stop a runaway process
Ready for the Next Stage?
- ✓ I can install and remove packages confidently on at least one distro family
- ✓ I can create a user and manage their administrative access
- ✓ I can create and extend an LVM volume, including growing the filesystem on top
- ✓ I can find and safely manage a running process
Milestone Badge: Junior Linux Administrator:
You've earned the Junior Linux Administrator badge. You can now install, configure, and maintain the core pieces of a real system, packages, users, and storage, without needing a tutorial open next to you.
What Success Looks Like: if you've completed everything in this stage, you should be able to stand up a working web server from a bare install, create the users it needs, and grow its storage without anyone walking you through it.
Estimated Time
3 to 4 weeks.
LinuxTeck Recommended Reading
DNF Guide for Beginners, Useful Yum Commands, How LVM Works in Linux, Building Reliable Storage with RAID, and Linux User Management the Easy Way.
Stage 4: Networking and Services
Goal
Understand how a Linux machine talks to the world and manages what's running on it, including what happens underneath systemd before you ever see a login prompt.
Why This Stage Matters
This is where "my server" becomes "a server other things depend on." A machine that can't be reached over the network or can't recover from a failed boot isn't production-ready no matter how well configured it looks locally.
What You Should Learn
- ✓ systemd and service management.
systemctl lets you start, stop, enable, and check the status of services. Enabling a service and starting it are two different things, and beginners frequently confuse them.
- ✓ The boot sequence. GRUB2 hands off to the kernel, the kernel loads an initramfs to mount the real root filesystem, and only then does systemd take over and walk through targets like
multi-user.target. Knowing this makes rescue mode make sense instead of feeling like magic.
- ✓ Rescue and recovery. When GRUB itself won't boot, the fix is booting a rescue ISO, mounting the broken system's partitions, and using
chroot to work inside it as if it had booted normally.
- ✓ Basic networking.
ip a shows your network identity, ss shows what's listening on which ports, and understanding basic DNS resolution explains why "the internet is down" is rarely actually true.
- ✓ Firewalls conceptually.
ufw on Ubuntu and firewalld on Rocky Linux control what traffic is allowed in and out, and neither should ever be treated as an on or off switch.
- ✓ SSH as your primary remote access method. Key-based authentication is safer and more convenient than passwords once it's set up correctly.
Skill Tree
Stage 4: Networking and Services
├── systemd
├── Boot Sequence
├── Rescue Mode
├── IP and Ports
├── Firewalls
└── SSH
Goal:
By the end of this stage, a server that won't boot or won't respond over the network should feel like a puzzle to solve methodically, not a five-alarm panic.
Hands-on Practice
Enable and disable a service and watch what happens on the next reboot. Deliberately comment out a non-critical line in /etc/fstab on a disposable test VM, then practice recovering it using rescue mode. Check what's listening on a machine with ss. Set up SSH key-based authentication and confirm it works in a second terminal session before touching password login settings.
Run these commands to confirm a service's real state, diagnose it if it fails, and check your network identity.
# Ubuntu service name is ssh, Rocky is sshd
systemctl is-enabled ssh
# The real diagnostic when a service fails to start
sudo journalctl -xeu sshd
# Confirm your network identity and open ports
ip a
sudo ss -tulnp
The first command should return enabled, not just active, and the ss output should show port 22 listening if SSH is running, confirming both that the service is running now and that it will still be running after the next reboot.
Mini Project
Secure an SSH server. Generate an SSH key pair, copy the public key to your test server, confirm key-based login works, then disable password authentication entirely and change the default port. Confirm you can still get in before you consider it done.
Common Mistakes
Assuming a service starts automatically without ever enabling it. Troubleshooting with systemctl status alone instead of reading the full journal with journalctl -xeu. Opening firewall ports without understanding what's actually listening behind them. Editing GRUB configuration blindly without a rescue plan.
Do's
Always verify a service is both active and enabled, they're independent settings. Test SSH key authentication in a second terminal window before disabling password login in the first one.
Don'ts
Don't disable password SSH login before confirming key authentication actually works, that's how people lock themselves out of their own server. Don't skip practicing rescue mode, the first time you need it should never be during a real incident.
Don't Learn This Yet:
❌ Load balancers, ❌ service meshes, ❌ VPNs and site-to-site networking. Get one server talking to the world reliably before worrying about how many servers talk to each other.
Interview Readiness
By the end of this stage, you should be able to answer:
- ✓ Explain the boot sequence from GRUB to a login prompt
- ✓ Explain the difference between a service being active and being enabled
- ✓ Explain how you'd recover a system where GRUB won't boot
- ✓ Explain how you'd check what's listening on a server and why
Ready for the Next Stage?
- ✓ I can enable, disable, and check the status of a systemd service
- ✓ I understand the boot sequence well enough to explain it and troubleshoot it
- ✓ I can check what's listening on a machine and reason about why
- ✓ I can connect over SSH using keys, not just passwords
Milestone Badge: Linux Operator:
You've earned the Linux Operator badge. Your server can now reliably talk to the world, recover from a bad boot, and be accessed securely, which is the real definition of "production-adjacent" at this point in the roadmap.
What Success Looks Like: if you've completed everything in this stage, you should be able to explain what happens between pressing the power button and getting a login prompt, and recover a server that won't boot without panicking.
Estimated Time
3 to 4 weeks.
LinuxTeck Recommended Reading
Systemd Targets and Boot Modes Explained, Fixing Systemd Service Errors, Installing and Securing an SSH Server, Secure SSH Access with Passwordless Login, and 8 Linux Networking Commands.
Stage 5: Shell Scripting and Automation
Goal
Stop doing repetitive tasks by hand. Make the system do the boring, error-prone work reliably instead of relying on memory and manual effort every time.
Why This Stage Matters
This is what separates someone who can operate one server from someone who can responsibly manage many of them. A script that runs the same way every single time is more trustworthy than a human repeating a checklist from memory at 2am.
What You Should Learn
- ✓ Bash scripting fundamentals. Variables, conditionals, loops, and functions are the building blocks. Start small, a five-line script that checks something and reports back is a real accomplishment.
- ✓ Cron and scheduling.
crontab syntax lets you run scripts on a schedule. Systemd timers are the modern alternative and are worth knowing about even if cron remains more common in practice.
- ✓ Exit codes and error handling. A script that fails silently is worse than no script at all. Learn to check exit codes and log failures somewhere you'll actually see them.
- ✓ Automated provisioning concepts. Cloud-init and Kickstart exist because clicking through an installer every time doesn't scale. You don't need to master these yet, but you should know they exist and what problem they solve.
Skill Tree
Stage 5: Shell Scripting and Automation
├── Variables
├── Conditionals
├── Loops
├── Functions
├── Cron
└── Provisioning
Common Mistake:
Writing a script that works perfectly when you run it yourself proves almost nothing about whether it will work unattended through cron. Always test the scheduled version, not just the manual one.
Hands-on Practice
Write a script that checks disk usage and logs a warning if it crosses a threshold. Schedule it with cron. Deliberately write a script that assumes a relative path, run it manually to confirm it works, then run it through cron and watch it fail, so you understand exactly why that happens.
Run these to confirm your scheduled jobs exist and check whether they actually executed, then peek at provisioning status if your instance was built with cloud-init.
# List the current user cron jobs
crontab -l
# Cron logs: Ubuntu/Debian then Rocky/RHEL
sudo journalctl -u cron
sudo journalctl -u crond
# Check provisioning status on a cloud-init built instance
cloud-init status --long
The cron log entries should show your job actually firing at the scheduled time. If crontab -l shows the job but the logs show nothing at the expected time, the schedule syntax itself is the next thing to check.
A personal example of exactly this failure: a backup script that worked perfectly every time it was run manually, then failed silently every night through cron for two weeks. It called a binary using a relative path that only resolved correctly in an interactive shell. Cron runs with a stripped-down PATH, and nothing about that failure shows up unless the logs actually get read.
Mini Project
Write your first automation script. Automate one real, repeated task, a backup, a log cleanup, or a disk space check, and confirm it runs correctly both manually and on a cron schedule, with proper exit codes and logging.
Common Mistakes
Using relative paths inside scripts that will run unattended through cron. Not redirecting a script's output and errors to a log file anywhere. Writing scripts with no error handling that fail silently instead of loudly. Treating every script as disposable instead of something worth keeping and reusing.
Do's
Always use absolute paths in scheduled scripts. Always log output somewhere you'll actually check later. Test a script manually before trusting cron to run it unattended.
Don'ts
Don't assume a script's cron environment matches your interactive shell environment, it doesn't. Don't skip exit code checks in anything that runs without a human watching it.
Don't Learn This Yet:
❌ Ansible playbooks, ❌ CI/CD pipelines, ❌ infrastructure as code tools. All of them are built on the exact scripting and scheduling fundamentals you're building right now, master this first.
Interview Readiness
By the end of this stage, you should be able to answer:
- ✓ Explain cron and how its scheduling syntax works
- ✓ Explain Bash variables, conditionals, and loops
- ✓ Explain why a script can work manually but fail through cron
- ✓ Explain what problem tools like Cloud-init and Kickstart solve
Ready for the Next Stage?
- ✓ I can write a bash script using variables, conditionals, and loops
- ✓ I understand why cron jobs fail silently and how to prevent it
- ✓ I know at least one automated provisioning tool by name and what problem it solves
- ✓ I've written and scheduled at least one real, working script
Milestone Badge: Automation Engineer:
You've earned the Automation Engineer badge. You can now make the system do repetitive work reliably instead of relying on memory, which is the skill that scales you from managing one server to managing many.
What Success Looks Like: if you've completed everything in this stage, you should be able to write a script, schedule it, and trust it to run correctly at 3am without you watching it happen.
Estimated Time
3 to 4 weeks.
LinuxTeck Recommended Reading
Write Your First Bash Script, Bash If Statement Complete Guide, Bash For Loop Examples, Bash Exit Codes and Error Handling, and Switching from Cron Jobs to Systemd Timers.
Stage 6: Security and Troubleshooting
Goal
Develop the instinct to diagnose problems methodically, and hold a system to a real security baseline instead of "it's not obviously broken."
Why This Stage Matters
This is genuinely the stage that separates hobbyists from hires. Production systems get attacked, and they fail. Both are learnable skills, not luck, and both depend far more on habits than on memorized commands.
What You Should Learn
- ✓ SELinux or AppArmor fundamentals. These enforce access rules beyond standard permissions. A denial from SELinux is not the same thing as a standard permissions problem, and treating it that way leads people to disable it instead of understanding it.
- ✓ Firewall management.
ufw on Ubuntu, firewalld on Rocky Linux. Learn to write and audit specific rules, not just toggle the firewall on or off.
- ✓ Log-based troubleshooting.
journalctl -xeu <service> for a specific unit, journalctl -b for everything since the last boot. Reading a log methodically beats panic-scrolling every time.
- ✓ Structured incident diagnosis. Form a hypothesis, check one thing at a time, and confirm before you act. Restarting a service and hoping is not a diagnosis, it's a temporary patch at best.
Skill Tree
Stage 6: Security and Troubleshooting
├── SELinux / AppArmor
├── Firewalls
├── Log Analysis
└── Incident Diagnosis
Career Tip:
Interviewers for real sysadmin and SRE roles frequently ask "walk me through how you'd troubleshoot this" rather than "what does this command do." This stage is where you build the story you'll actually tell in that interview.
Hands-on Practice
Intentionally trigger an SELinux denial on a test system and diagnose it properly instead of disabling SELinux to make the symptom disappear. Write a specific firewall rule set instead of leaving default settings in place. Use journalctl -xeu and journalctl -b to trace a deliberately broken service end to end.
Run these to see your current security posture on each distro before you change anything.
# Ubuntu firewall
sudo ufw status verbose
# Rocky Linux: SELinux mode and active firewall rules
getenforce
sudo firewall-cmd --list-all
getenforce should return Enforcing on a properly hardened Rocky system, not Permissive or Disabled. If it's not enforcing, that's a gap worth closing before you consider this checkpoint done.
The first time SELinux blocked something on one of my own systems, it genuinely looked like a permissions bug, ownership and mode were both correct. It took a while to realize the denial had nothing to do with standard permissions at all. Catching that during a calm practice session is far better than catching it during an actual incident.
Mini Project
Harden a test server and recover it from a simulated failure. Lock down SSH, configure firewall rules properly, confirm SELinux or AppArmor is enforcing, then deliberately break something and diagnose it using only logs, no restarting blindly allowed.
Common Mistakes
Disabling SELinux instead of understanding the denial it's raising. Treating "restart the service" as a diagnosis rather than a temporary patch. Opening broad firewall rules "to make it work" and never tightening them back up afterward. Checking systemctl status and stopping there instead of reading the actual journal.
Do's
Check getenforce or sestatus before assuming a permissions issue is really a permissions issue. Keep a running note of what you changed during any troubleshooting session so you can undo it cleanly.
Don'ts
Don't disable a security control to solve a symptom, fix the actual cause instead. Don't guess-and-check changes on a production system without a rollback plan already in mind.
Don't Learn This Yet:
❌ SIEM platforms, ❌ enterprise vulnerability scanners, ❌ compliance frameworks like SOC 2 or ISO 27001. Those all assume the fundamentals in this stage are already second nature.
Interview Readiness
By the end of this stage, you should be able to answer:
- ✓ Explain what SELinux or AppArmor actually enforces, and why a denial isn't a permissions error
- ✓ Explain the difference between journalctl -xeu and journalctl -b
- ✓ Walk through how you'd diagnose a service that fails to start, step by step
- ✓ Explain why restarting a service is not the same thing as fixing it
Ready for the Next Stage?
- ✓ I can diagnose why a service fails to start using logs alone
- ✓ I understand SELinux or AppArmor well enough to fix a denial instead of disabling it
- ✓ I can write and audit firewall rules, not just toggle the firewall on and off
- ✓ I approach an incident with a hypothesis to test, not a guess to try
Milestone Badge: Linux Troubleshooter:
You've earned the Linux Troubleshooter badge. This is genuinely the stage that separates hobbyists from hires, and clearing it honestly means you now think in hypotheses instead of guesses when something breaks.
What Success Looks Like: if you've completed everything in this stage, you should be able to walk someone through diagnosing a broken service from log line one, without ever needing to restart it blindly first.
Estimated Time
4 to 5 weeks.
LinuxTeck Recommended Reading
Linux Server Hardening Checklist, Top Linux Security Tools, Linux Security Threats in 2026, SSH Troubleshooting Guide, and Linux Ransomware Protection.
Stage 7: Production Linux Administration
Goal
Keep systems healthy and recoverable under real, ongoing operational load, not just correctly configured once and left alone.
Why This Stage Matters
Unlike every earlier stage, this one never really finishes. It's the practical difference between "I set this server up" and "I run this server," and it's where a resume goes from listing tools to describing actual operational responsibility.
What You Should Learn
- ✓ Monitoring fundamentals. Know what to actually watch: CPU, memory, disk, and service health at a minimum, before reaching for any dedicated monitoring platform.
- ✓ Backup strategy. The 3-2-1 concept, three copies, two different media, one offsite, and the far more important habit of actually testing a restore instead of taking backups on faith.
- ✓ High availability basics. Understand what redundancy actually buys a system, and just as importantly, what it doesn't, since redundant compute with a single storage backend isn't actually redundant.
- ✓ Container basics. Docker is the common default on Ubuntu, Podman is the daemonless alternative that's default on Rocky Linux and the RHEL family. Both answer the same underlying question: what's running, and is it behaving.
- ✓ Cloud and VPS operations. The habits that matter change slightly once a box has a public IP and real, ongoing constraints instead of being a disposable local VM.
Skill Tree
Stage 7: Production Linux Administration
├── Monitoring
├── Backups and Restores
├── High Availability
├── Containers
└── Cloud Operations
Remember:
This is the one stage without a finish line. Treat the checklist below as a floor you maintain, not a box you check once and move on from.
Hands-on Practice
Set up even a simple scripted health check that logs CPU, memory, and disk on a schedule. Take a backup, then actually restore it somewhere to prove it works rather than trusting it blindly. Run a container and check its resource usage. Revisit the LVM skill from stage 3 and extend a volume under simulated load, without downtime.
Run these to get a baseline read on any server you're responsible for, container status plus memory headroom and uptime.
# Ubuntu with Docker, Rocky with Podman
docker ps
podman ps
# Memory headroom and uptime
free -h
uptime
If free -h shows very little available memory or uptime's load average is consistently higher than your CPU core count, that's a real signal worth investigating now, not after something falls over.
Mini Project
Deploy a production-ready VPS. Stand up a small cloud instance, harden it using everything from stage 6, run a real service in a container, schedule backups, verify a restore actually works, and write down what would happen tonight if the disk filled up. If you can answer that last question honestly, this project is done.
Common Mistakes
Taking backups but never testing a restore. Treating monitoring as something you set up once and forget. Assuming a container is automatically more secure than a virtual machine just because it's newer technology. Adding redundancy in one place while leaving an obvious single point of failure somewhere else entirely.
Do's
Always test a restore, not just a backup. Write down your disaster recovery plan before you need it, not while you're living through an incident.
Don'ts
Don't assume "it's in the cloud" means someone else is backing it up for you. Don't run production workloads on a server you've never intentionally tried to break in a safe environment first.
Don't Learn This Yet:
❌ Multi-region architecture, ❌ service mesh, ❌ chaos engineering platforms. These build directly on production fundamentals, backups, monitoring, and containers, that you're establishing right here.
Interview Readiness
By the end of this stage, you should be able to answer:
- ✓ Explain the 3-2-1 backup rule and why testing a restore matters more than the backup itself
- ✓ Explain what redundancy actually protects against, and what it doesn't
- ✓ Explain the difference between Docker and Podman at a conceptual level
- ✓ Walk through what you'd check first if a server ran out of disk space at 2am
Ready for the Next Stage?
- ✓ I have a backup and restore process that I've actually tested
- ✓ I can run and manage basic container workloads
- ✓ I monitor at least CPU, memory, disk, and service health on any system I run
- ✓ I could hand this server to another admin with documentation that would actually help them
Milestone Badge: Production Linux Administrator:
You've earned the Production Linux Administrator badge, the final one on this roadmap. You can now keep a real system healthy and recoverable under ongoing load, which is the actual job, not just the setup.
What Success Looks Like: if you've completed everything in this stage, you should be able to hand a server you built to a stranger, along with documentation, and trust they could keep it running without calling you.
Estimated Time
4 to 6 weeks to a credible baseline, ongoing after that. This stage doesn't have a finish line, it has a floor.
LinuxTeck Recommended Reading
Linux Server Backup Solutions, Best Linux Monitoring Tools, Docker Management Command Cheat Sheet, and Migrating a Linux Server to AWS Cloud.
Complete Linux Learning Timeline
These estimates assume consistent, hands-on practice, not passive reading. Move faster if you have prior IT experience, slower if you're learning around a full-time job, and that's completely normal either way.
| Stage |
Estimated Time |
Cumulative Time |
| 1: Linux Fundamentals |
1 to 2 weeks |
1 to 2 weeks |
| 2: Working with the Filesystem |
2 to 3 weeks |
3 to 5 weeks |
| 3: System Administration Basics |
3 to 4 weeks |
6 to 9 weeks |
| 4: Networking and Services |
3 to 4 weeks |
9 to 13 weeks |
| 5: Shell Scripting and Automation |
3 to 4 weeks |
12 to 17 weeks |
| 6: Security and Troubleshooting |
4 to 5 weeks |
16 to 22 weeks |
| 7: Production Administration |
4 to 6 weeks to baseline |
20 to 28 weeks |
That works out to roughly 5 to 7 months to a genuinely job-ready baseline with consistent effort, which lines up with the 6 to 12 month range most people quote for this journey once slower weeks and real life are factored in.
Skills Matrix: Where Each Skill Is Actually Introduced
| Skill |
Primary Stage |
| Terminal navigation |
1 |
| File permissions and ownership |
2 |
| Package management |
3 |
| LVM and storage |
3 |
| User and group administration |
3 |
| Systemd and the boot process |
4 |
| Networking basics |
4 |
| Shell scripting |
5 |
| Cron and automated provisioning |
5 |
| SELinux, AppArmor, and firewalls |
6 |
| Log-based troubleshooting |
6 |
| Monitoring |
7 |
| Backups and restores |
7 |
| Containers |
7 |
Career Readiness by Stage
| Stage Reached |
Possible Job Role |
Confidence Level |
| 1 to 2 |
Not yet job ready, IT support adjacent |
Foundational |
| 3 to 4 |
Junior Linux Administrator, Support Engineer |
Operational |
| 5 to 6 |
Linux Administrator, Junior DevOps Engineer |
Confident |
| 7 |
Linux Administrator, SRE, DevOps Engineer |
Production ready |
Salary figures shift too often to print reliably in an article, so for current numbers by role and region, see the Linux sysadmin salary guide instead of trusting a static table.
Mistakes That Keep People Stuck
Beyond the stage-specific mistakes already covered, a few habits show up constantly in people who stall out for months without realizing why.
- Tutorial hopping. Jumping between courses and articles without ever finishing one full stage in a real environment.
- Memorizing instead of understanding. Being able to recite a command's syntax without knowing what it actually changes on the system.
- Skipping stage 2 because it feels boring. Permissions feel tedious compared to scripting or containers, right up until a script fails for a permissions reason nobody can explain.
- Learning Docker or Kubernetes before basic administration. Containers still run on a Linux kernel, and container problems are frequently Linux problems wearing a different name.
- Never breaking anything on purpose. Real troubleshooting instinct only develops by fixing things you broke intentionally in a safe environment first.
- Not testing progress honestly. "I think I understand this" and actually completing the ready-for-the-next-stage checklist are two very different things.
Should You Learn Ubuntu or Rocky Linux First?
Start with Ubuntu. It has the largest community, the widest hardware support, and the biggest tutorial base anywhere online, which matters enormously when you're stuck on something at 11pm with nobody to ask. None of that locks you in. Nearly everything from stages 1 and 2 transfers directly to any other distro.
By stage 3, deliberately cross-train into Rocky Linux or another RHEL-family system. Enterprise job postings skew heavily toward RHEL-family administration, and the divergence starting around package management, dnf versus apt, plus differences in file locations and service naming, is real enough that experience on one doesn't automatically transfer to the other.
| Factor |
Ubuntu |
Rocky Linux |
| Best for |
Absolute beginners |
Enterprise-track learners |
| Community size |
Larger |
Smaller but focused |
| Certification alignment |
LFCS |
RHCSA, RHCE |
See the full RHEL vs Ubuntu server comparison and Debian vs Ubuntu for more detail before committing to a specialization.
Recommended Certifications
Certifications become worth attempting around stage 4 at the earliest, and realistically stage 5 or 6, since every major Linux certification assumes you're already comfortable with users, permissions, and services.
| Certification |
Best For |
When to Attempt |
| CompTIA Linux+ |
Vendor-neutral entry point, multiple choice |
Stage 3 to 4 |
| LPIC-1 |
Vendor-neutral, broader topic coverage |
Stage 4 |
| RHCSA |
Enterprise RHEL-family administration |
Stage 5 to 6 |
| LFCS |
Distro-neutral, hands-on, performance based |
Stage 5 to 6 |
| RHCE |
Ansible automation on top of RHCSA |
Stage 6 to 7 |
Worth knowing if you're planning around this in 2026: Red Hat restructured its entire certification program in May 2026 into five tracks, Enterprise Linux, Ansible, OpenShift, Cloud-native Applications, and AI, with five progressive levels each. RHCSA keeps its name and exam code, EX200, but is now formally the Level 2 Administrator exam in the Enterprise Linux track, and it's currently based on RHEL 10. One myth worth retiring: several older study guides list containers and Podman as graded RHCSA material, but the current EX200 objectives don't include a containers domain, so don't burn lab time drilling that specifically for the exam. LFCS is unaffected by this restructuring since it's a separate, vendor-neutral certification body. Check current objectives and pricing directly on the Linux Foundation's LFCS certification page, and see the full Linux certifications comparison for cost and recognition.
Recommended Home Lab
You don't need real hardware or a budget to start. A free local VM covers every checkpoint through stage 6 without issue.
- VirtualBox. Free, cross-platform, and the easiest starting point for stages 1 through 4.
- VMware Workstation Player. Free for personal use, a solid alternative if VirtualBox gives you trouble on a specific host OS.
- Proxmox. Free and worth graduating to once you want to practice actual virtualization host management, a real step up from just running guest VMs.
- Cloud VPS. This is where stage 7 actually pays off, since monitoring and recovering from a real outage are far more convincing on a remote box with a public IP than on a laptop VM.
If you get to the VPS stage, comparisons like DigitalOcean vs Vultr or Cloudways vs Vultr are worth reading before committing to a monthly budget. If you'd rather offload some server management while you focus on learning, the Cloudways review and DigitalOcean review cover what each platform actually handles for you. For application-level hosting once you're past the pure sysadmin stages, the Kinsta review is worth a look too.
Learning Resources
LinuxTeck articles cover the roadmap itself, but a few outside resources are worth having in your back pocket too.
Recommended Books
"The Linux Command Line" by William Shotts, a genuinely free, thorough introduction that pairs well with stages 1 and 2. "How Linux Works" by Brian Ward, for understanding the mechanisms underneath the commands once you reach stage 4 or so. "UNIX and Linux System Administration Handbook" by Nemeth, Snyder, Hein, Whaley, and Mackin, a long-standing reference worth owning by stage 6.
Free Learning Platforms
The Linux Foundation's free "Introduction to Linux" course on edX pairs well with stages 1 through 3. KodeKloud runs a free tier and periodic free access weeks with real hands-on labs, useful from stage 3 onward. OverTheWire's Bandit wargame is a genuinely fun, free way to sharpen terminal fluency built up in stages 1 and 2.
Practice Labs
Killercoda offers free, browser-based Linux scenarios with no local setup required, good for stages 3 through 6 without touching your own machine. Your own VirtualBox or Proxmox home lab remains the most flexible practice environment for everything in this roadmap.
LinuxTeck Articles
Every stage above links directly to the specific LinuxTeck guides that go deeper on that stage's material, use those as your primary reference and come back to this roadmap to check your progress against the checklists.
The Final Printable Roadmap
One table, the entire roadmap. Print this page or bookmark it and come back to check your progress.
| Stage |
Primary Skills |
Mini Project |
Time |
Milestone |
Job Readiness |
Certification |
| 1: Linux Fundamentals |
Terminal, filesystem basics, help system |
Create your first VM |
1 to 2 wks |
Linux Explorer |
Not yet |
None yet |
| 2: Filesystem |
Permissions, ownership, storage basics |
Manage users and permissions |
2 to 3 wks |
Filesystem Explorer |
Not yet |
None yet |
| 3: System Administration |
Packages, LVM, users, processes |
Host your first web server |
3 to 4 wks |
Junior Linux Administrator |
Junior roles |
CompTIA Linux+ |
| 4: Networking and Services |
systemd, boot process, SSH, networking |
Secure an SSH server |
3 to 4 wks |
Linux Operator |
Junior roles |
LPIC-1 |
| 5: Shell Scripting |
Bash, cron, provisioning basics |
Write your first automation script |
3 to 4 wks |
Automation Engineer |
Mid-level roles |
RHCSA / LFCS eligible |
| 6: Security and Troubleshooting |
SELinux/AppArmor, firewalls, log diagnosis |
Harden a server, recover from failure |
4 to 5 wks |
Linux Troubleshooter |
Mid-level roles |
RHCSA / LFCS / RHCE |
| 7: Production Administration |
Monitoring, backups, HA, containers |
Deploy a production-ready VPS |
4 to 6 wks |
Production Linux Administrator |
Senior / SRE roles |
RHCE / advanced tracks |
Linux Learning Roadmap - FAQ
Q1: How long does it actually take to go from zero to job ready?
Most people reach a junior level, stages 3 to 4, in two to three months of consistent hands-on practice. Reaching a genuinely hireable mid-level position, stages 5 to 6, takes another three to four months on top of that. Consistency running real commands on a real system beats reading intensity every time.
Q2: Do I need a computer science degree to learn Linux?
No. Linux administration is one of the most accessible technical career paths precisely because it rewards hands-on practice over formal education. Plenty of working sysadmins came from IT support, help desk roles, or a completely unrelated field and built these skills through consistent practice rather than a degree program.
Q3: Should I learn Ubuntu or Rocky Linux first?
Start with Ubuntu for the easier on-ramp and larger community, then deliberately cross-train into Rocky Linux by stage 3, since enterprise job postings lean heavily RHEL-family. See the full RHEL vs Ubuntu comparison before specializing further.
Q4: Is shell scripting mandatory, or can I rely on GUI tools?
You can avoid scripting through stage 4, but stage 5 and everything after it assumes you can automate repetitive tasks. Production servers rarely have a GUI at all, and managing more than one server by hand simply stops scaling. Start with bash -x script.sh to debug your first scripts line by line rather than attempting something complex on day one.
Q5: What certification should I target and when?
RHCSA and LFCS are the two most recognized hands-on options once you reach stage 5 or 6, and both are performance-based rather than multiple choice. LPIC-1 and CompTIA Linux+ are reasonable earlier stepping stones if you'd rather start with a multiple-choice format. See the full certification comparison for cost and recognition.
Q6: Do I need to learn Docker and Kubernetes early on?
No, and doing so is one of the most common mistakes that keeps people stuck. Containers still run on a Linux kernel, and most container problems are Linux fundamentals problems wearing a different name. Save containers for stage 7, once packages, storage, services, and troubleshooting are already solid.
Q7: Can I learn Linux administration without ever touching physical hardware?
Yes, and most people learning today never touch physical hardware at all. A local virtual machine covers stages 1 through 6 fine. Stage 7 concepts like monitoring under real load and recovering from an actual outage are far more convincing on a small cloud instance than on a laptop VM.
Q8: How do I know I'm actually ready to move to the next stage?
Use the "Ready for the Next Stage" checklist at the end of each stage in this roadmap honestly, not optimistically. If you're guessing at even one item on that list, spend another week on the current stage instead of moving forward on the theory that you'll pick it up later.
Q9: What's the single biggest mistake beginners make?
Memorizing commands instead of understanding what they actually change on the system. Being able to type chmod 755 from memory is not the same as understanding what that permission set actually allows, and the gap between those two things shows up the moment a tutorial's exact scenario doesn't match your real one.
Q10: Is Linux administration still a good career path given AI and automation?
Yes, foundational Linux administration skills remain in demand, since AI tooling and automation platforms still run on Linux systems that someone has to install, secure, and keep running. Automation tends to shift the work toward higher-level troubleshooting and architecture rather than eliminating the need for the underlying skill entirely, which is exactly what stages 5 through 7 in this roadmap prepare you for.
Final Thoughts: Follow the Stages, Not Just the Commands
The seven stages here aren't a strict ladder you climb once and forget, they're layers that keep getting reinforced. Someone deep into stage 6 troubleshooting will still occasionally circle back and double-check a permissions assumption from stage 2, and that's not a failure, that's just how real system knowledge accumulates over time.
If you're at the very beginning, give yourself an honest week or two on stage 1 before worrying about anything else on this page. If you're already a few stages in, the fastest way forward is deliberately breaking things on a disposable VM or VPS and fixing them without copying a forum answer first. Either way, the habit that compounds the fastest is checking the "ready for the next stage" list honestly before moving on, rather than assuming you'll catch up later.
Whichever stage you're in right now, pair this roadmap with a real system administration guide and a DevOps career guide once you're past stage 4, since both go deeper into exactly what this roadmap is preparing you for.