In Linux, every file and directory has an owner and a group. These ownership settings help the system decide who can access, modify, or manage a file. When the wrong user or group owns a file, you may face problems such as permission errors, failed deployments, broken uploads, or services that cannot access the files they need.
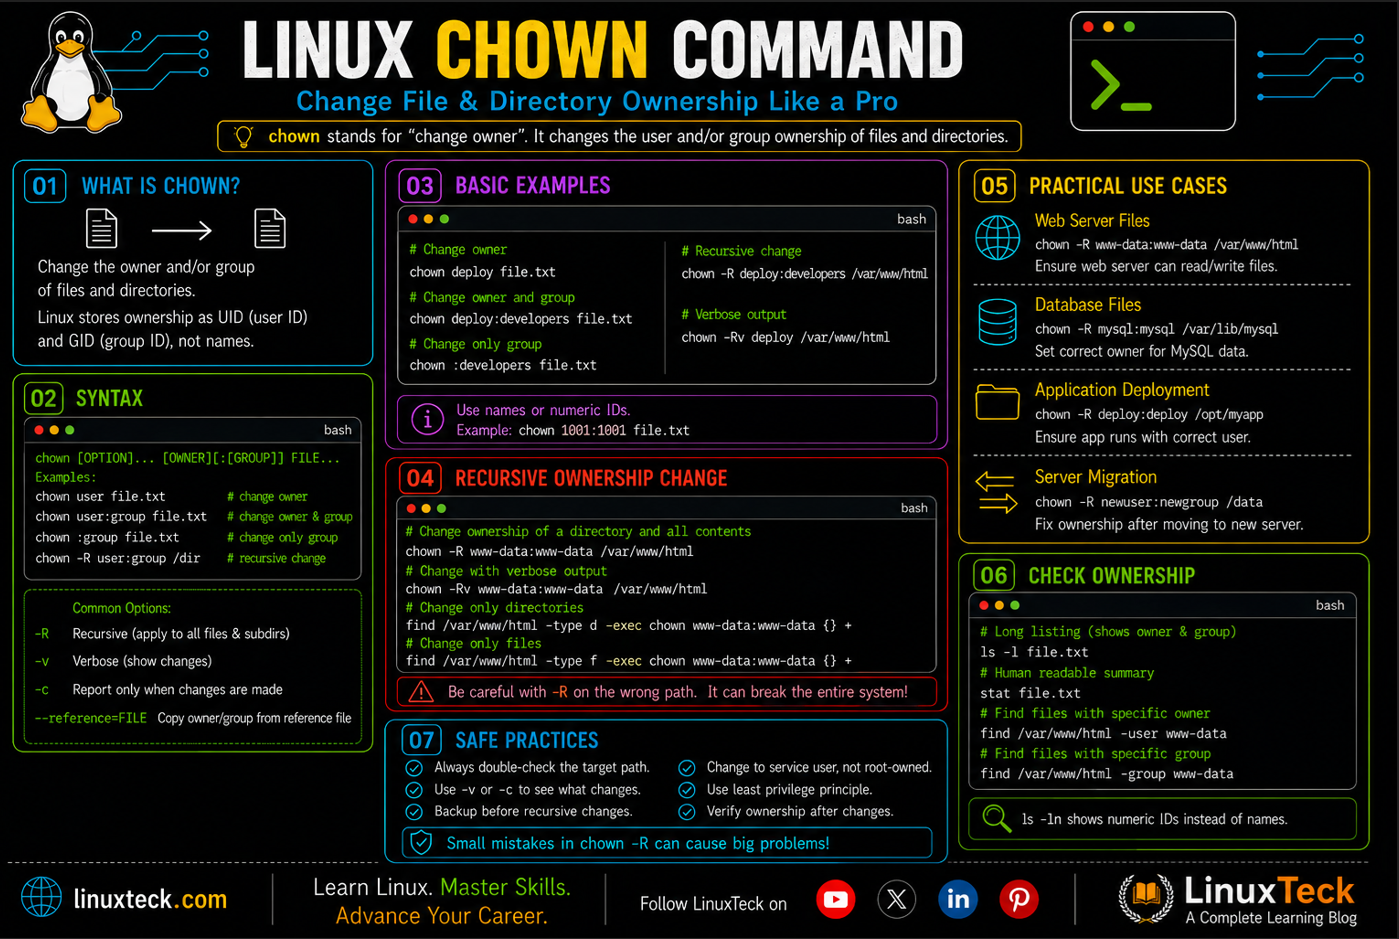
The chown command is used to change the owner or group of files and directories in Linux. In this guide, you will learn how the command works, understand its syntax and commonly used options, and see practical examples for files, directories, symbolic links, web servers, database restores, and server migrations. You will also learn how to use recursive ownership changes safely and avoid common mistakes that can affect an entire system.
Note:
If you're still getting comfortable with permission bits themselves, it helps to read up on how chmod controls read, write, and execute permissions first. Ownership and permissions work together, not separately.
Examples
What Is the Chown Command in Linux?
chown stands for "change owner." Every file and directory on a Linux system belongs to a user and a group, and chown is the tool that lets you change either or both.
Under the hood, Linux doesn't store a name like "sarah" or "www-data" against a file. It stores a numeric UID and GID, and the system maps those numbers back to readable names using /etc/passwd and /etc/group. That's why you can chown a file to a UID that doesn't have a matching name yet, and it'll just show up as a number when you check with ls -l until a name is added. Once you start managing services that run as their own system accounts, like a database or a web server, chown is the command that keeps their files walled off from everyone else on the box.
Chown Syntax Explained
LinuxTeck.com
# change owner and group of a file
chown deploy app.log
# makes "deploy" the owner, group is untouched
chown deploy:developers app.log
# changes both owner and group in one shot
chown :developers app.log
# colon with no name before it only changes the group
The part people trip over is the colon. Owner, then colon, then group, no spaces anywhere in that block. Leave the group off entirely and only the owner changes. Put a colon with nothing after it and the group gets set to that user's own login group automatically.
Note:
Typing just chown deploy: with a trailing colon and nothing after it isn't the same as leaving the colon off. It sets the group to deploy's own login group even if that wasn't your intention, so double check what you actually meant to type.
Version & Compatibility Note:
Older UNIX systems and legacy scripts often use a dot instead of a colon to separate user and group (for example chown deploy.developers app.log). Modern GNU coreutils versions still support this for backward compatibility, but it is strongly discouraged today. If your Linux environment manages accounts containing dots, such as first.last names synced through SSSD or Active Directory, using the dot separator causes syntax ambiguity and can throw command errors. Always stick to the colon syntax.
Chown Options and Flags
| Flag | What It Does | When to Use It |
|---|---|---|
| -R | Applies the change to a directory and everything inside it | Fixing ownership across a whole project or web root |
| -v | Prints a line for every single file it touches | Watching a recursive change happen in real time |
| -c | Only reports files where the ownership actually changed | Logging changes from a script without noisy output |
| -h | Changes the symlink itself, not the file it points to | Working with directories full of symbolic links |
| -f | Suppresses most error messages | Running chown inside a script where some files may not exist |
| --from | Only changes files currently owned by a specific user or group | Migrating files between accounts without touching unrelated files |
| --reference | Copies ownership from another file instead of naming it directly | Matching new files to an existing folder's ownership pattern |
Chown Command Examples
I. Check Current Ownership Before Changing Anything
Before you touch ownership, look at what you're starting with. A quick ls -l tells you the current owner and group for every file in a directory.
LinuxTeck.com
-rw-r--r-- 1 root root 512 Jul 9 10:12 style.css
drwxr-xr-x 2 root root 4096 Jul 9 10:12 images
II. Change the Owner of a Single File
This is the simplest form. One owner name, one target file, nothing else changes.
LinuxTeck.com
III. Change Owner and Group Together
Most of the time you want both set at once, especially when handing a folder over to a service account that also has its own group.
LinuxTeck.com
IV. Change Only the Group
Leave the owner name off and start with a colon to touch the group and nothing else.
LinuxTeck.com
V. Recursive Ownership Change With -R
Once you need to touch a whole directory tree, -R does the walking for you instead of chowning each file one by one.
LinuxTeck.com
VI. Change Ownership of a Symlink Itself
Without -h, chown reaches through a symlink and changes the file it points to. With -h, it changes the link.
LinuxTeck.com
VII. Watch Every File Change With -v
Useful when you're running a big recursive change for the first time on a directory you're not fully sure about.
LinuxTeck.com
changed ownership of '/home/deploy/app/config.yml' from root:root to deploy:deploy
changed ownership of '/home/deploy/app/logs' from root:root to deploy:deploy
VIII. Target Only Files Owned by a Specific Account
--from lets chown skip anything that isn't currently owned by the account you name, which is handy when a directory has a mix of files from different past deployments.
LinuxTeck.com
IX. Fixing Ownership After Moving a Site to a New Server
When you rsync a website from an old host to a new one, file ownership often comes across as your personal SSH user instead of the web server account. This is the fix.
LinuxTeck.com
Tip:
Run this right after any migration or restore, before you even try loading the site. Broken ownership is one of the most common causes of a fresh "500 Internal Server Error" on a newly migrated stack.
X. Fixing a Database Data Directory After a Restore
Restoring a database backup as root is common, but the database process itself usually runs as its own account and needs to own its data directory to even start.
LinuxTeck.com
XI. The Mistake: Running -R on the Wrong Path
This is basically the story from my intro. A missing trailing slash, an extra space, or a copy-pasted path from a different terminal tab, and -R will happily rewrite ownership across way more than you intended.
Warning:
sudo chown -R www-data:www-data /var/www /html looks almost identical to the correct command, but that stray space turns it into two separate targets, /var/www and a totally unrelated /html directory at the root of the filesystem. Always run pwd or echo the path before hitting enter on a recursive chown.
The safer version confirms the path first, then runs the change:
LinuxTeck.com
ownership of '/var/www/html/images' changed to www-data:www-data
Why Chown Matters
Ownership is the first gate a process hits before permissions even get checked. A web server that can't own its own upload folder can't write to it, no matter how generous the permission bits look. Get chown wrong on a production box and you don't get a warning, you get a service that silently refuses to write logs, save sessions, or accept uploads.
This is also where good user and service account management pays off. Systems that separate every service into its own account, each with narrow ownership over only what it needs, contain the damage when one service gets compromised. Pairing that habit with a proper server hardening checklist and sensible sudo configuration closes most of the gap between "it works" and "it's actually secure." Full details on the command's behavior across versions live in the official chown manual page.
Key Points
- Use
chown user:group fileto set both owner and group in one command instead of running chown and chgrp separately. - Confirm the target path with
pwdorls -ldbefore adding -R, since a wrong path with -R rewrites ownership across an entire tree in seconds. - Prefer -c over -v in scripts, so chown only logs files it actually changed instead of every file it touches.
- Reach for
--from=user:groupwhen you only want to update files currently owned by one specific account, useful during server migrations. - Use -h on symlinks, otherwise chown silently changes the file the link points to rather than the link itself.
- Match a service's data directory ownership to the account that service actually runs as, not to root, or the service may fail to start after a restore.
- Keep a user management cheat sheet handy so you're never guessing which system accounts a fresh install already created for you.
- Pair chown with find when you need to change ownership based on file type or age instead of an entire directory.
Frequently Asked Questions
Do I need to be root to use chown?
Yes, in almost every case. Regular users can't hand off ownership of their own files to someone else, that would let anyone dodge disk quotas by giving files away. You'll need sudo or to be logged in as root for chown to actually take effect.
Why does my chown command say "operation not permitted"?
Almost always a missing sudo. Add sudo in front of the command and try again. If it still fails, check whether the filesystem is mounted read-only or if you're working inside a container where UID mapping is restricted.
What happens if I only put a colon after the username in chown?
Typing chown deploy: with nothing after the colon sets the group to deploy's own login group. It's a small detail but it changes the group even though you didn't type a group name, so it's worth double checking before you hit enter.
Does chown -R follow symbolic links inside directories?
By default, no, -P behavior is the default and symlinks themselves aren't traversed during a recursive run. If you need it to follow every symlink it finds, add -L, but be careful, that can reach outside the directory you meant to target.
Can I use chown with a numeric UID instead of a username?
Yes. chown 1001 file works the same as using a name, and it's actually handy when you're restoring files from a backup where the matching username doesn't exist yet on the new box.
How do I check what chown actually changed before running it recursively?
Run it with -v first on a small test folder, or use -c on the real run so it only prints the files it actually modified. There's no true dry run flag for chown, so testing on a subset first is the safest habit.
From your first terminal command to advanced sysadmin skills, every guide here is written in plain English with real examples you can run right now.