
This guide to install Coolify on VPS is tested on a fresh Ubuntu 24.04 LTS droplet with 2 vCPUs, 4 GB RAM, and 40 GB of disk, plus a second pass on a Rocky Linux 9 box to confirm where the steps diverge. The Coolify version referenced here is the 4.x line, currently on the 4.3.x stable series, running on Docker Engine 24+. By the end, you will have a working Coolify dashboard, a secured admin account, and a properly configured VPS ready to deploy your applications.
Why Install Coolify on VPS Instead of Managed Hosting
A managed platform is not selling you compute, it is selling you the convenience of git push and a dashboard that just works. That convenience is priced per app, per add-on database, and per team seat, and the bill compounds fast once you are running more than one project.
When you install Coolify on VPS, it strips the pricing model out and keeps the workflow. You still get git push deploys, one-click PostgreSQL, MySQL, MongoDB, and Redis provisioning, automatic Let's Encrypt certificates, and build logs streaming in a browser. The difference is that all of it runs as Docker containers on hardware you already own, and adding a fifth app costs nothing extra because you are not paying per application. If you are newer to the Linux side of this, our Linux quick start guide is a reasonable primer before diving into server administration this way.
Where you actually host it matters more than people expect, since build performance and network reliability vary a fair bit between providers at this price point. Our DigitalOcean vs Vultr comparison is a reasonable starting point if you have not settled on one yet.
By the end of this guide to install Coolify on VPS you will have a Coolify instance running behind your own domain with a valid SSL certificate, not just parked on an IP address and a port number, and you will know how to keep it patched.
Prerequisites Before You Start
Coolify installs itself and manages Docker for you, but the box underneath still needs to meet a few numbers. Do not skip this part, an undersized VPS is the single biggest reason people end up with a dashboard that loads for thirty seconds and then times out.
- CPU: 2 vCPU cores minimum. Coolify uses Nixpacks to build your app images, and builds are CPU-bound, not RAM-bound.
- RAM: 2 GB is the bare floor, but Coolify itself now runs closer to 800 MB to 1 GB idle with audit logging and Sentinel monitoring active, up from roughly 600 MB in earlier v4 releases. 4 GB is the realistic minimum if you plan to run more than one app.
- Disk: At least 30 GB of free disk space. The installer checks this and will refuse to continue if you are under it.
- OS: Ubuntu 22.04/24.04 LTS or Debian 12 get the smoothest automated install. RHEL-family distros (Rocky, AlmaLinux, RHEL) work but sometimes need Docker installed manually first.
- Access: Root or a sudo user, plus SSH access. Non-root installs are not fully supported as of Coolify v4.
- Docker Engine: Version 24 or newer is required. Docker installed via
snapis not supported and will break the installer. - Ports: 22 (SSH), 80 and 443 (HTTP/HTTPS), 8000 (dashboard, before you attach a domain), 6001 and 6002 (realtime updates and terminal features).
- Public IPv4: Required if you want Let's Encrypt SSL to issue automatically.
Warning:
If you skip the disk space check and run the installer on a droplet with less than 30 GB free anyway, the script fails partway through and can leave orphaned Docker volumes behind. Resize the disk first, do not try to squeeze it in after the fact.
If you have not picked a provider yet, the sizing above rules out many basic VPS plans. With Coolify, however, you can take an unmanaged VPS and add your own management layer, giving you many of the conveniences you'd expect from a more premium hosting setup. Our Verpex review looks at whether its unmanaged VPS plans are a good fit for this approach. If you're still comparing providers, our guide to choosing VPS hosting walks through the key trade-offs.
How to Install Coolify on Your VPS
Step 1 - Update the System and Confirm Access
SSH in as root or a sudo user first, then pull the latest package lists. Running Coolify's installer on a stale system is one of the more common ways builds start failing later on for reasons that have nothing to do with Coolify itself.
On Ubuntu/Debian:
LinuxTeck.com
ssh root@your_server_ip
# Refresh package lists and upgrade
apt update && apt upgrade -y
On RHEL/Rocky Linux:
LinuxTeck.com
ssh root@your_server_ip
# Update all packages
dnf update -y
Expected output:
A clean "up to date" message means you are good to move on. If apt reports broken packages, run apt --fix-broken install before continuing, the Coolify installer will not fix a broken package manager for you. If you are on a fresh DigitalOcean droplet and this is your first time setting one up, our DigitalOcean review covers what the base image ships with by default.
Step 2 - Open the Required Firewall Ports
Coolify needs six ports reachable: SSH, HTTP, HTTPS, the dashboard, and two realtime ports for live logs and the in-browser terminal. Set these before installing, not after, so you are not locked out mid-setup.
On Ubuntu/Debian (UFW):
LinuxTeck.com
ufw allow 22/tcp
ufw allow 80/tcp
ufw allow 443/tcp
# Coolify dashboard + realtime
ufw allow 8000/tcp
ufw allow 6001/tcp
ufw allow 6002/tcp
ufw enable
On RHEL/Rocky Linux (firewalld):
LinuxTeck.com
firewall-cmd --permanent --add-port=80/tcp
firewall-cmd --permanent --add-port=443/tcp
firewall-cmd --permanent --add-port=8000/tcp
firewall-cmd --permanent --add-port=6001/tcp
firewall-cmd --permanent --add-port=6002/tcp
# Apply the rules
firewall-cmd --reload
Expected output:
If your cloud provider also has its own network firewall panel (DigitalOcean, Hetzner, Vultr and most others do), open the same six ports there too. Docker writes its own rules directly into iptables and can quietly bypass UFW, so the provider-level firewall is your real backstop. For a wider walkthrough on locking a fresh box down before this stage, see our Linux server hardening checklist and our firewall-cmd command reference.
Step 3 - Run the Coolify Installer
This one command installs curl, wget, git, jq, and openssl if they are missing, installs Docker Engine if it is not already there, creates /data/coolify for persistent storage, and pulls and starts the Coolify, PostgreSQL, Redis, and realtime containers. It also pulls in Nixpacks and Railpack, the build tools Coolify uses later to turn a Git repo into a Docker image without you writing a Dockerfile. On Ubuntu and Debian it is fully automated.
On Ubuntu/Debian and most Rocky/RHEL systems:
LinuxTeck.com
curl -fsSL https://cdn.coollabs.io/coolify/install.sh | bash
# Or run with sudo
curl -fsSL https://cdn.coollabs.io/coolify/install.sh | sudo bash
Expected output:
The whole run usually takes 3 to 5 minutes depending on your network speed. That final URL is your dashboard address, port 8000, before you attach a domain. Do not close the terminal until you see "Coolify is ready."
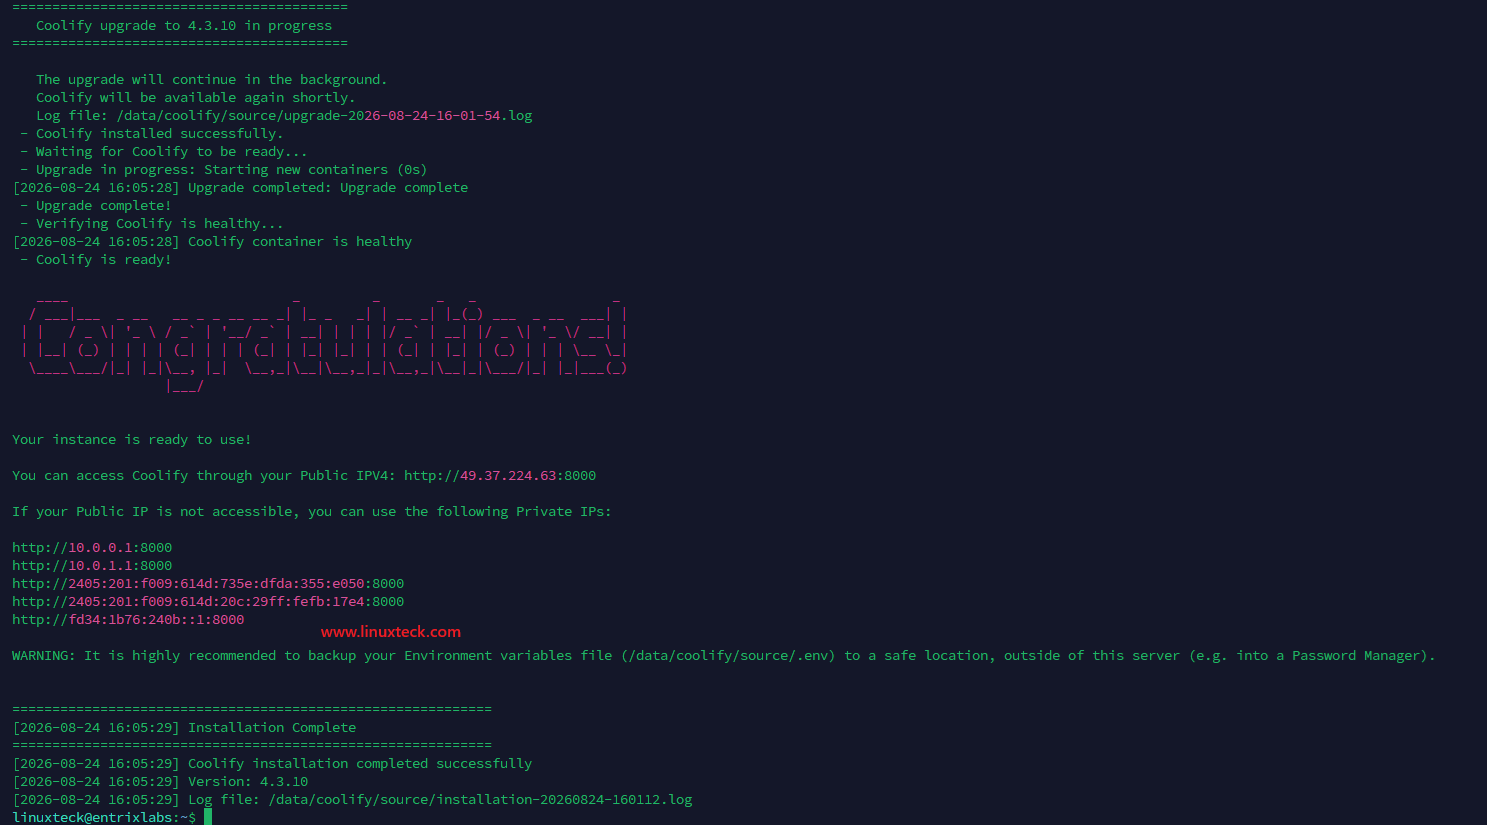
If you see This script must be run as root, prefix the command with sudo bash -c or switch to the root user first. On AlmaLinux or some Rocky images the script may stop and ask you to install Docker manually before it continues, in which case install Docker via the official repo and re-run the same command. This shows up more often on certain providers' Rocky Linux images than others, our Vultr review notes which distro images come with Docker-friendly defaults.
Step 4 - Access the Dashboard and Claim the Admin Account
Open http://your_server_ip:8000 in a browser right after the install finishes. You will land on a registration page. Whoever fills this form first becomes the permanent server admin, so do this before you walk away from the terminal.
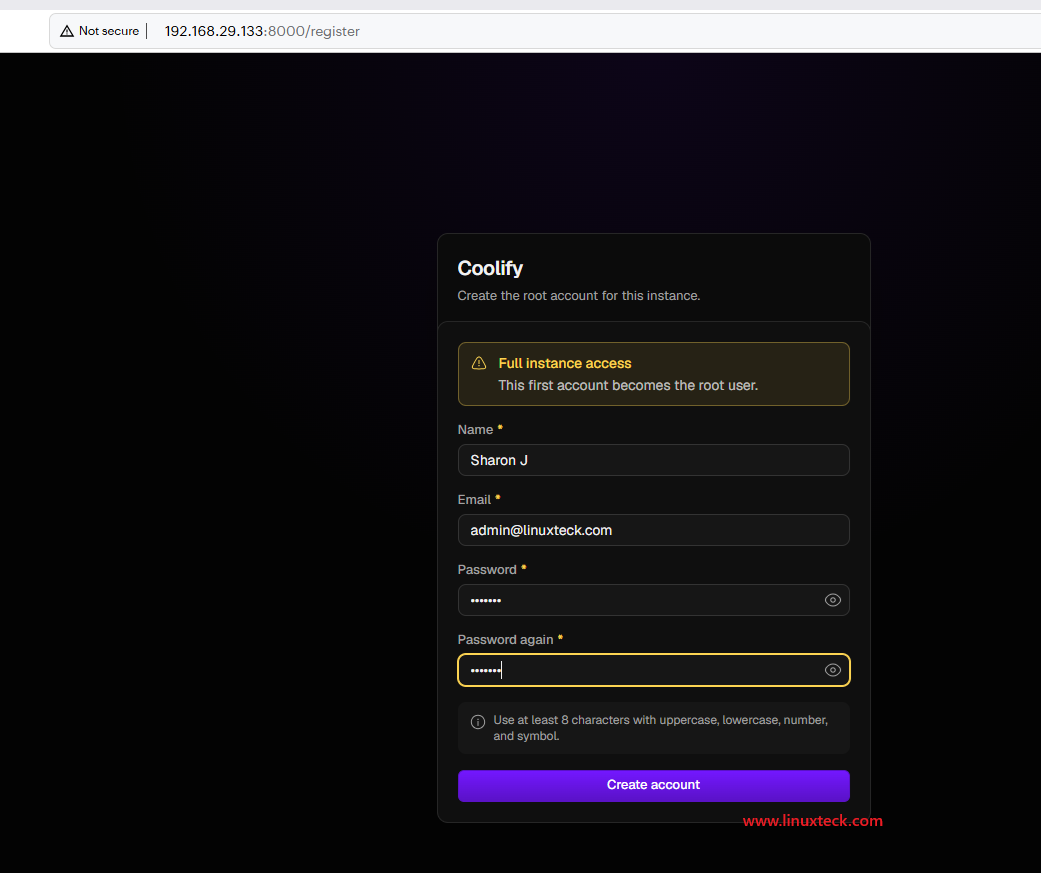
If you would rather not race the clock, set the admin account during install instead by exporting ROOT_USERNAME, ROOT_USER_EMAIL, and ROOT_USER_PASSWORD before running the install command, for example: ROOT_USERNAME=admin ROOT_USER_EMAIL=you@yourdomain.com ROOT_USER_PASSWORD=changeme bash -c \'curl -fsSL https://cdn.coollabs.io/coolify/install.sh | bash\'. The registration page never becomes reachable to anyone else because the account already exists.
While that page is loading, you can confirm all four containers are healthy from the terminal:
LinuxTeck.com
docker ps --format 'table {{.Names}}\t{{.Image}}\t{{.Status}}'
Expected output:
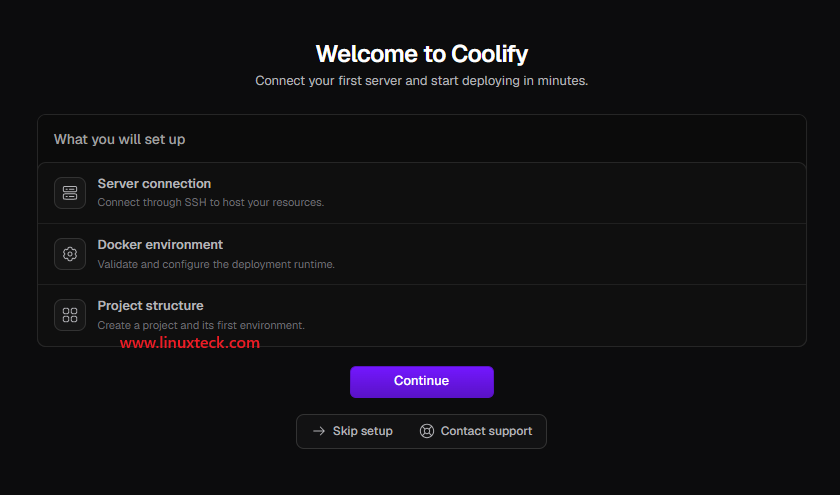
Four containers showing "Up" confirms the stack is healthy: the Coolify app itself, the realtime service, the Postgres database, and the Redis queue that Coolify's deployment jobs run through. On the registration page, set a strong password and email, then log in.
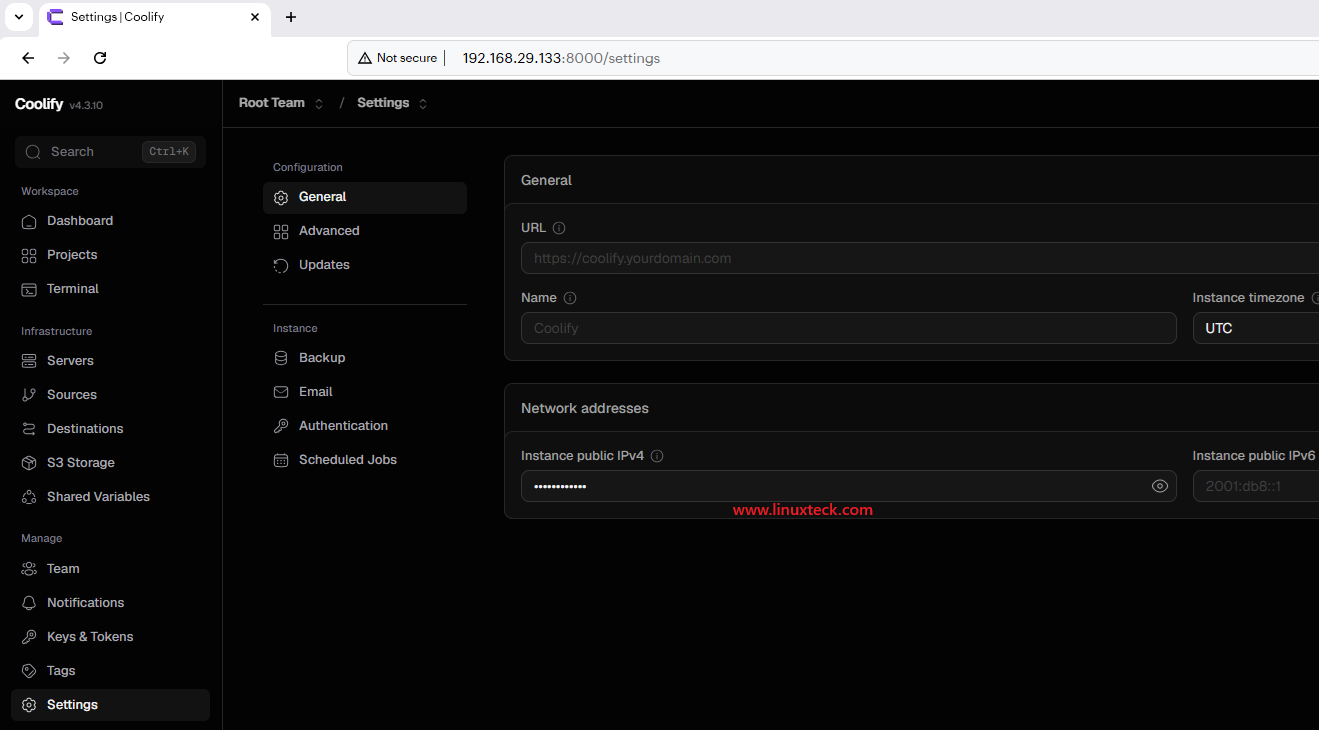
From the dashboard's Settings page you can later attach a domain, which flips the access URL from port 8000 to standard 80/443 with automatic SSL through Let's Encrypt.
If you are logged in as a non-root user who has not been added to the docker group, prefix the command with sudo, for example sudo docker ps --filter "name=coolify". The Coolify installer runs as root, so this only comes up if you switched to a regular user afterward.
Step 5 - Point Your Domain and Enable HTTPS
Running the dashboard on http://your_server_ip:8000 is fine to get started, but it is not something you want to bookmark long term. Point a domain or subdomain at the server and Coolify will move the dashboard to standard HTTPS on its own.
Before touching Coolify's settings, create an A record for something like coolify.yourdomain.com pointing at your server's IP, then confirm it has actually propagated:
LinuxTeck.com
dig +short coolify.yourdomain.com
Expected output:
If that command returns nothing, DNS has not propagated yet, give it a few minutes and try again before touching Coolify's settings.
Once the record resolves, go to Settings then Instance Settings in the Coolify dashboard and set the Instance Domain field to https://coolify.yourdomain.com, with the https:// included. Traefik picks up the change and requests a Let's Encrypt certificate automatically, usually issued within about 30 seconds of saving. The dashboard URL then switches from the IP and port 8000 to your domain over standard HTTPS, and every app you deploy afterward gets its own subdomain and certificate the same way.
Warning:
Do not forget the https:// prefix in the domain field. Entering just the bare hostname is the single most common reason the certificate request fails silently.
Note:
Coolify pulls your applications from Git and builds them with Nixpacks or a Dockerfile you provide. If you are new to connecting repositories over SSH from a server, our passwordless SSH login guide and essential Git commands article cover the setup Coolify expects.
Note:
Coolify ships with Traefik as the default reverse proxy handling routing and SSL for your apps. Coolify v4 also lets you swap to Caddy or a custom proxy from the dashboard's proxy settings, in which case the container name you see in docker ps changes accordingly, so do not assume "coolify-proxy" always means Traefik on every install.
Common Errors When You Install Coolify on VPS
Dashboard hangs at http://your_ip:8000 and never loads. This is almost always a firewall miss, either the provider's network panel or a UFW rule that did not get applied. Re-check both, not just one.
Installer exits with Docker installed via snap is not supported. Run snap remove docker, reboot, then run the install script again so it can install Docker Engine the normal way.
Builds fail or time out on small apps that should build in seconds. Check free -h, if available memory is under 500 MB the Nixpacks build process gets killed by the OOM reaper. Add swap or move to a larger plan rather than fighting it with build flags. A 2 GB swap file is usually enough to get a small VPS through a build without upgrading:
LinuxTeck.com
fallocate -l 2G /swapfile
chmod 600 /swapfile
mkswap /swapfile
swapon /swapfile
# Make it persist across reboots
echo "/swapfile none swap sw 0 0" >> /etc/fstab
Swap will not make a genuinely undersized VPS fast, it just keeps a burst build from getting killed outright. If you are hitting this on every deploy rather than occasionally, that is a sign to move up a plan instead of leaning on swap long term.
SSL certificate fails to generate after attaching a domain. Confirm the domain field in Coolify settings starts with https://, not just the bare hostname, and confirm the A record has actually propagated with dig your-domain.com before retrying.
Securing Your Coolify VPS Installation
Coolify becomes the single control point for every app on this box, which makes the host itself worth locking down properly, not just leaving it on password auth because it was faster to set up.
Critical:
Coolify runs as root by default, and the project disclosed 11 critical vulnerabilities in January 2026, including a command injection issue and a root SSH key exposure bug, all fixed in later beta and stable builds. Running an old, unpatched install is a real risk on a box with root-level control over every app you deploy. Keep Coolify current (see the update section below) and treat this server as a higher-value target than a normal app server.
LinuxTeck.com
ssh-keygen -t ed25519 -C "deploy@yourdomain.com"
# Copy the public key to the server
ssh-copy-id -i ~/.ssh/id_ed25519.pub root@your_server_ip
# Disable password logins
sudo sed -i -E "s/^[#]?PasswordAuthentication (yes|no)/PasswordAuthentication no/" /etc/ssh/sshd_config
sudo systemctl restart sshd
Expected output:
Test the key-based login in a second terminal window before you close the first one. If it works, password auth is now off and brute-force login attempts against port 22 stop being a real threat. For a deeper checklist beyond SSH, our server hardening checklist and SSH troubleshooting guide are good next reads, and if you want to compare how RHEL-family and Ubuntu handle hardening differently, see RHEL vs Ubuntu Server.
Production Tip:
Set up a basic backup routine for /data/coolify before you deploy anything real on this server. Our Linux server backup solutions guide covers a few approaches that work well for a single Docker host like this one. It also helps to keep an eye on resource usage once you start stacking multiple apps, our monitoring tools roundup lists lightweight options that will not compete with Coolify for RAM.
Keeping Coolify Updated
Given the CVE history above, staying current is not optional housekeeping, it is part of running this server safely. Coolify checks for updates from the dashboard, or you can trigger one from the terminal by re-running the same install command, it detects the existing instance and upgrades in place rather than reinstalling from scratch.
LinuxTeck.com
tar czf /tmp/coolify-backup-$(date +%Y%m%d).tar.gz /data/coolify/
# Re-run the installer to upgrade in place
curl -fsSL https://cdn.coollabs.io/coolify/install.sh | bash
Download that backup archive off the server before you upgrade, not just onto the same disk. Coolify's own release notes flag breaking changes when they happen, worth a quick skim on the official changelog before updating a server with anything important running on it.
Frequently Asked Questions
Do I need a domain name to use Coolify?
No. You can run everything off http://your_server_ip:8000 indefinitely, or use Coolify's free sslip.io subdomain, which resolves to your server's IP automatically and still gets a valid Let's Encrypt certificate. A real domain is only required if you want a custom URL for your apps.
Does Coolify run on Kubernetes?
No, Coolify's multi-server support is built on Docker Swarm, not Kubernetes. That makes it far simpler to operate than a real k8s cluster, but it also means it is not the right tool if you need Kubernetes-grade scheduling, autoscaling, or multi-region failover.
Is it safe to run apps on the same server as Coolify itself?
It works and plenty of people do it for hobby projects, but the common advice from experienced operators is to keep the Coolify control plane on its own small server once you are running anything you care about, and deploy apps to separate servers Coolify manages remotely over SSH. That way a bad build or a resource spike on an app server never threatens the dashboard that manages everything. If you go this route, our Cloudways vs Vultr comparison is a decent way to think about splitting a control-plane box from your app servers across providers.
What happens if I lock myself out after disabling SSH password login?
As long as your key-based login worked before you closed the original session, you are fine. If something goes wrong, most VPS providers offer a browser-based console or recovery mode that bypasses SSH entirely, which is your fallback to fix sshd_config or re-add a key.
Does Coolify back up my application data automatically?
Not by default. Coolify backs up its own configuration, and it can schedule automated dumps of any managed database to S3-compatible storage. Application data volumes, uploaded files, and anything outside a managed database are your responsibility to back up separately.
Do I need a domain to enable HTTPS, or can I skip it?
You need either a real domain or Coolify's free sslip.io subdomain to get a proper Let's Encrypt certificate. Staying on the bare IP and port 8000 works for testing, but nothing forces HTTPS on that URL, so it should not be how you access Coolify day to day.
Conclusion
At this point you have successfully completed the process to install Coolify on VPS, with a running instance, an admin account only you control, SSH locked to key-based auth, and the right ports open and nothing extra exposed. That is a real deployment platform sitting on a VPS that probably costs less than a single day of a managed PaaS plan.
Go connect a Git repository next and push your first deployment through it, that is where Coolify actually starts saving you time. If you are managing a few docker containers alongside it, keep our Docker command cheat sheet open in a tab, it covers most of what you will reach for while debugging a container.
Have you run Coolify in production yet, and what was the part that tripped you up first, the build step, the SSL, or something with the firewall? Drop it in the comments. If this saved you a headache, share it with the next person about to overpay for hosting three side projects. And if after all this you decide self-hosting is not the right tradeoff for your time, there is no shame in that either, our Cloudways review covers a solid managed alternative.
This guide covered a complete, production-ready Coolify install on Ubuntu and RHEL-family servers, from prerequisites through SSH hardening.
LinuxTeck's Enterprise Linux category focuses on production-ready Linux skills including:
self-hosted PaaS deployment, Docker on VPS, SSH hardening,
firewall configuration, Linux server security, and VPS backup strategy.
Support My Work
Thank you for reading and for being part of this journey. If this article saved you time, consider buying me a coffee. Every contribution helps me keep producing in-depth, practical Linux content for readers like you.

Thank you for your endless support