
How LVM works in Linux comes down to one idea: it separates your storage from your partitions, so disk space stops being a fixed decision you make once at install time. Logical Volume Manager (LVM) is a flexible storage management system for Linux that makes it easier to create, resize, and manage disk space than traditional partitions. Instead of being limited by fixed partition sizes, LVM lets you allocate storage as your requirements grow.
Whether you're running Ubuntu, RHEL, Rocky Linux, Fedora, Debian, or Arch Linux, LVM helps simplify storage administration with features like logical volumes, snapshots, and online volume expansion, making it a common choice for servers and enterprise environments.
In this guide, you'll learn how LVM works, how to configure it step by step, and the best practices, common pitfalls, and production tips every Linux administrator should know.
| Metric | Value | Source | Relevance |
|---|---|---|---|
| Current LVM2 metadata format | LVM2 (text-based, backed up per VG) | man7.org lvm.conf | Determines how metadata recovery works after corruption |
| Default PE size | 4 MiB | vgcreate defaults | Sets the smallest unit an LV can grow or shrink by |
| Max PVs per VG | Unlimited (LVM2 metadata format; constrained only by available disk space for metadata) | lvm2 metadata spec | Relevant for large storage pools spanning many disks |
| Thin pool default chunk size | 64 KiB | lvmthin man page | Affects snapshot performance and metadata overhead |
What This Guide Covers:
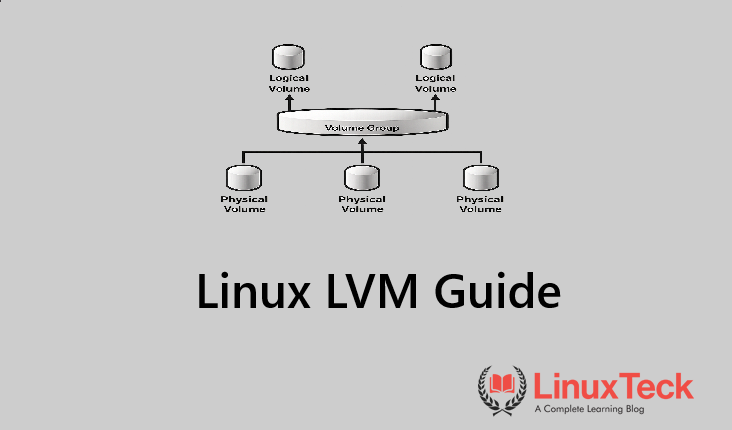
- How physical volumes, volume groups and logical volumes fit together
- Distro-specific setup for Ubuntu, Rocky/RHEL/AlmaLinux, Fedora and Arch
- Real production failure modes, not textbook warnings
- A validation script you can run after every LVM change
- Encryption, permissions and compliance angles for regulated environments
- A monitoring and maintenance cadence for teams running LVM at scale
How LVM works in Linux versus plain partitions or newer filesystems is not just an architecture question. LVM is not the only way to manage storage on Linux, and it is not always the right one. Use this table to decide before you commit a production box to a layout.
| Capability | Plain Partitions | LVM | Btrfs | ZFS on Linux |
|---|---|---|---|---|
| Live resize without downtime | Difficult, usually needs unmount | Yes, online | Yes, online | Yes, online |
| Snapshots | Not native | Yes, COW-based | Yes, native | Yes, native |
| Spans multiple disks natively | No | Yes, via VG | Yes | Yes, via pools |
| Default on major distros | Common on minimal images | Default on Rocky/RHEL installers | Default on openSUSE and Fedora Workstation | Requires DKMS module |
| Filesystem-agnostic | Yes | Yes, works under ext4, xfs, swap |
No, tied to Btrfs | No, tied to ZFS |
Tip:
If you already run xfs or ext4 in production and just need flexible resizing, LVM underneath your existing filesystem is a smaller change than migrating to Btrfs or ZFS. Compare the underlying ext4 vs xfs vs btrfs tradeoffs before you decide.
Environment and Prerequisites
| # | Environment / Distro | Type |
|---|---|---|
| 1 | Ubuntu 24.04 LTS / 26.04 LTS | Server and cloud |
| 2 | RHEL / Rocky Linux / AlmaLinux 9.x / 10.x | Enterprise server |
| 3 | Fedora 43 / 44 | Workstation and lab |
| 4 | Debian 12 (Bookworm) / 13 (Trixie) | Server and minimal images |
| 5 | Arch Linux | Rolling release, manual setup |
| Requirement | Details | Status |
|---|---|---|
| lvm2 package | Provides pvcreate, vgcreate, lvcreate and friends |
REQUIRED |
Root or sudo access |
Disk-level operations always need elevated privileges | REQUIRED |
| A spare block device or unpartitioned space | Loopback files work fine for practice, real disks for production | REQUIRED |
cryptsetup for encrypted volumes |
Only needed if you plan to run LUKS under LVM |
OPTIONAL |
| Recent full backup | Any partitioning change carries data loss risk | REQUIRED |
Warning:
Never run pvcreate against a disk that already holds data you care about. It does not ask twice, and it will overwrite the existing partition table signature. Test on a spare disk or a loopback file first.
If you do not have a spare server lying around to test this on, a small VPS is the cheapest way to practice without risking anything real. Compare providers like DigitalOcean vs Vultr or Cloudways vs Vultr before you pick one, and follow our Linux quick start guide to get the box ready.
How LVM Works in Linux: Architecture Overview (PV, VG, LV)
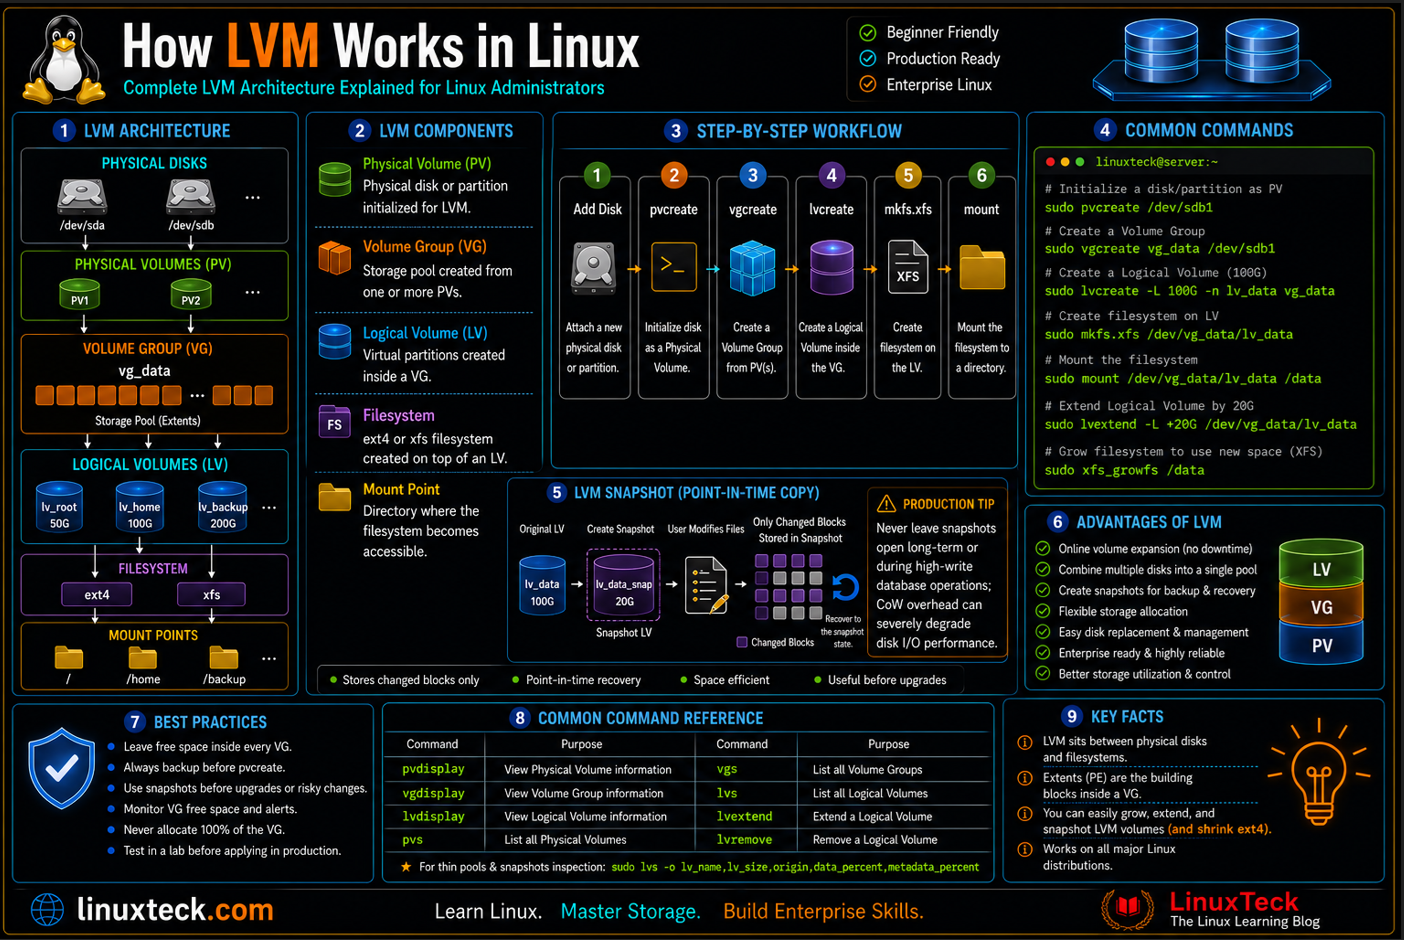
LVM sits as a layer between raw block devices and the filesystem. Three concepts do all the work, and once they click the rest of the tooling is just naming.
LVM STORAGE STACK

  Physical Disks        /dev/sdb   /dev/sdc   /dev/sdd
        |                   |          |          |
        v                   v          v          v
  Physical Volumes     [ PV ]      [ PV ]     [ PV ]     (pvcreate)
        |___________________|__________|__________|
                            |
                            v
                     Volume Group          [ vg_data ]   (vgcreate)
                            |
        ____________________|____________________
        |                    |                   |
        v                    v                   v
  Logical Volumes    [ lv_web ]          [ lv_db ]       (lvcreate)
        |                    |
        v                    v
   Filesystem            Filesystem
    (xfs/ext4)             (xfs/ext4)

  Extent size: 4 MiB (default)   Metadata: /etc/lvm/backup
Engineer note:
The volume group is the pool. Physical volumes feed disk space into it, logical volumes carve chunks back out. This is why you can add a fourth disk to vg_data at 3am and grow lv_db without touching the filesystem layout at all.
Step-by-Step: Building an LVM Setup
Step 1 - Install the lvm2 package
Most server images ship this already, but check before you assume it.
Ubuntu 24.04 LTS / 26.04 LTS
LinuxTeck
linuxteck@ubuntu:~$ sudo apt install -y lvm2
RHEL / Rocky Linux / AlmaLinux 9.x / 10.x
LinuxTeck
linuxteck@rocky:~$ sudo systemctl enable --now lvm2-monitor
Fedora 43 / 44
LinuxTeck
Arch Linux
LinuxTeck
linuxteck@arch:~$ sudo systemctl enable lvm2-monitor.service
Step 2 - Create the physical volume
This works the same on every distro, since it operates directly on the block device rather than through the package manager.
LinuxTeck
linuxteck@ubuntu:~$ sudo pvs
Step 3 - Create the volume group
The volume group pools the physical volumes together into one usable capacity.
LinuxTeck
linuxteck@ubuntu:~$ sudo vgs
Step 4 - Create the logical volume
Carve out a usable chunk from the pool. Leave some free space in the VG for future growth or snapshots, do not allocate 100 percent on day one.
LinuxTeck
linuxteck@ubuntu:~$ sudo lvs
Step 5 - Format and mount
xfs is the default on Rocky and RHEL, ext4 is still the safe default on Ubuntu and Arch for most workloads. One quick note before you run this: /dev/vg_data/lv_data and /dev/mapper/vg_data-lv_data point at the exact same device. Both work everywhere, but the fstab entry below deliberately uses the device-mapper path because it survives more edge cases (like a VG rename) without needing a re-edit.
LinuxTeck
# Recommended production fstab entry using device-mapper path
FSTAB_ENTRY="/dev/mapper/vg_data-lv_data /data xfs defaults 0 0"
# Create mount point if it does not exist, then append safely if missing
sudo mkdir -p /data
sudo mount /dev/vg_data/lv_data /data
grep -qF "$FSTAB_ENTRY" /etc/fstab || echo "$FSTAB_ENTRY" | sudo tee -a /etc/fstab
Step 6 - Grow the volume live
This is the entire reason most teams adopt LVM. No unmount, no downtime, run it while the application is serving traffic. Do the math before you run this though: vg_data started at roughly 199.99 GiB, lv_data was already at 150 GiB, and this command adds another 30 GiB. That leaves under 10 percent of the VG free, which sets up the exact zero-free-space problem covered in Issue 02 below. On a real disk, leave more headroom before you extend.
LinuxTeck
linuxteck@ubuntu:~$ sudo xfs_growfs /data
Commands you'll need beyond this walkthrough:
The six steps above cover building an LVM setup from nothing, but day-to-day LVM work leans on a handful of commands this walkthrough never touches. Worth knowing before you need them under pressure:
pvmove /dev/sdb /dev/sdd– migrates data off a PV live, with the application still running. This is the command that moves data off a dying disk before it fails, not after.vgreduce vg_data /dev/sdc– removes a PV from a VG once it holds no extents. Runpvmovefirst if the PV still has data on it.lvconvert --type thin-pool vg_data/lv_data– converts a thick LV into a thin pool after the fact, without recreating it.vgscanandvgchange -ay– the first two commands to reach for when a VG does not show up after a reboot.vgscanrebuilds the LVM cache from what is physically attached,vgchange -ayactivates whatever it finds.
Production Pitfalls and Fixes
Growing the LV but forgetting the filesystem
Environment: RHEL / Rocky Linux 9.x, xfs filesystem, remote hands doing a routine disk expansion.
Failure pattern: They ran lvextend and stopped there. The LV showed the new size but df -h still showed the old capacity, because the filesystem itself never got told to grow into the new space.
LinuxTeck
linuxteck@ubuntu:~$ sudo xfs_growfs /data
# For EXT4 (requires logical volume block device path):
linuxteck@ubuntu:~$ sudo resize2fs /dev/vg_data/lv_data
Volume group left with zero free space
Environment: Ubuntu 24.04, single-disk VG, no room for snapshots.
Failure pattern: The LV was created at 100 percent of the VG on day one. Later, a routine lvcreate -s for a pre-upgrade snapshot failed with "Insufficient free extents" during a maintenance window, and the rollback plan had to be scrapped mid-change.
LinuxTeck
Duplicate PV UUIDs after cloning a VM
Environment: KVM clone of a Rocky Linux template used for a new database node.
Failure pattern: The cloned VM booted with the same LVM UUIDs as the source template. vgs showed duplicate volume group names across both hosts, and the wrong one occasionally got activated first.
LinuxTeck
linuxteck@ubuntu:~$ sudo vgimportclone -n vg_data_new /dev/sdb1
# If raw disk was initialized directly as PV (no partition table):
linuxteck@ubuntu:~$ sudo vgimportclone -n vg_data_new /dev/sdb
linuxteck@ubuntu:~$ sudo vgchange -ay vg_data_new
Thin pool metadata filling up silently
Environment: Fedora Server 43/44 running container storage on a thin-provisioned pool.
Failure pattern: Data usage looked fine at 60 percent, but the metadata volume for the thin pool quietly hit 100 percent first. Writes started failing across every LV in the pool at once, not just the one that was full.
LinuxTeck
Snapshot left mounted and forgotten
Environment: Arch Linux workstation used for testing a package upgrade before a rollout.
Failure pattern: A pre-upgrade snapshot got created and never removed. Weeks later the snapshot silently filled and dropped, and lvs showed it as invalid, but nobody noticed until a restore was actually needed.
LinuxTeck
Wrong disk targeted during
pvcreate
Environment: RHEL 9.x bare metal server with device names that shifted after a reboot.
Failure pattern: /dev/sdb was the OS disk after a controller reorder, not the spare disk it had been the week before. pvcreate wiped the partition signature on the wrong device in seconds.
LinuxTeck
Post-Action Validation Script
Run this after any LVM change before you sign off on the ticket. It checks PV, VG and LV health plus free space headroom in one pass.
LinuxTeck
set -euo pipefail
VG_NAME="vg_data"
THRESHOLD=90
echo "=== LVM Health Check: ${VG_NAME} ==="
# Check if Volume Group exists
if ! sudo vgs "$VG_NAME" &>/dev/null; then
echo "ERROR: Volume Group '$VG_NAME' does not exist."
exit 1
fi
# Calculate percentage of used space in VG
TOTAL_PE=$(sudo vgs --noheadings -o vg_size --units m "$VG_NAME" | tr -d ' mMBGg' | cut -d'.' -f1)
FREE_PE=$(sudo vgs --noheadings -o vg_free --units m "$VG_NAME" | tr -d ' mMBGg' | cut -d'.' -f1)
if [ -z "$TOTAL_PE" ] || [ "$TOTAL_PE" -eq 0 ]; then
echo "ERROR: Unable to retrieve Volume Group size."
exit 1
fi
USED_PCT=$(( 100 * (TOTAL_PE - FREE_PE) / TOTAL_PE ))
echo "VG Space Usage: ${USED_PCT}% (Threshold: ${THRESHOLD}%)"
if [ "$USED_PCT" -ge "$THRESHOLD" ]; then
echo "WARNING: Volume Group space usage exceeds threshold!"
exit 1
else
echo "PASS: Volume Group storage is within safe limits."
fi
Tip:
Wire this into your change ticket process. A FAIL exit code should block the ticket from closing, not just print a warning nobody reads.
Security and Compliance
Encryption-ready
Audit-friendly metadata
SELinux compatible
LinuxTeck
linuxteck@ubuntu:~$ sudo cryptsetup luksOpen /dev/vg_data/lv_secure secure_data
linuxteck@ubuntu:~$ sudo mkfs.xfs /dev/mapper/secure_data
The commands below use semanage and restorecon, which are SELinux tools. They apply to RHEL, Rocky Linux, AlmaLinux and Fedora, which run SELinux by default. Ubuntu, Debian and Arch default to AppArmor or no mandatory access control at all, so skip this block on those distros and rely on standard file permissions instead.
LinuxTeck
linuxteck@rocky:~$ sudo restorecon -Rv /data
linuxteck@rocky:~$ sudo chmod 750 /data
linuxteck@rocky:~$ sudo chown svc_app:svc_app /data
LVM metadata itself is stored as plain text under /etc/lvm/backup and should be included in your regular audit trail. For a broader hardening pass on the box, pair this with our Linux server hardening checklist and confirm your security tooling is scanning mounted LVs the same way it scans everything else. For the underlying command reference, the official lvm man page on man7.org is the source of truth.
Monitoring and Maintenance Checklist
LVM does not need daily babysitting, but a few checks on a schedule catch the failures above before they become incidents.
On Alert:
- VG free space drops below 10 percent, page the on-call owner
- Thin pool
metadata_percentcrosses 80 percent, treat as urgent - Any PV shows as missing in
pvsoutput after a reboot
Weekly:
- Review
lvs -o lv_name,snap_percentfor stale snapshots older than a few days - Confirm nightly backups cover every mounted LV, not just the OS disk
Monthly:
- Verify
/etc/lvm/backupmetadata is current and included in offsite backup rotation - Cross-check disk serials against the asset inventory to avoid a repeat of the wrong-disk incident
Quarterly:
- Run a full restore test from an LVM snapshot on a non-production box
- Review VG layout against current capacity growth trends and plan ahead of the next disk order
Questions I Get Asked About This All the Time
How do I extend or resize a partition using LVM?
Check free space in the volume group first with vgs. If there is room, run lvextend -L +30G /dev/vg_name/lv_name to grow the logical volume, then grow the filesystem on top of it with xfs_growfs /mount/point for xfs or resize2fs /dev/vg_name/lv_name for ext4. If the VG itself has no free space left, add a disk with pvcreate and vgextend before you extend the LV. Sections 05 and 06 above walk through this exact sequence, including what happens when you forget the filesystem-grow step.
Can I grow an LV without unmounting it?
Yes, for ext4 and xfs both lvextend and the filesystem grow commands work online. xfs cannot be shrunk though, only grown, so plan sizing with that in mind.
How does an LVM snapshot differ from a full system backup?
A snapshot only tracks changed blocks since it was taken, and it lives on the same volume group as the source. If the underlying disk fails, the snapshot fails with it. Use snapshots for a quick rollback point during a change, not as your actual backup strategy.
Can I shrink a logical volume safely?
You can with ext4, but always shrink the filesystem first with resize2fs before you shrink the LV with lvreduce, never the other order. xfs cannot be shrunk at all, you would need to recreate the volume and migrate data.
What actually happens if I lose one disk in a striped VG?
You lose the whole volume group. LVM striping is about performance, not redundancy. If you need fault tolerance across disks, put RAID underneath LVM rather than relying on LVM alone. Our RAID storage guide walks through that layering.
Does LVM slow down disk I/O noticeably?
In most workloads the overhead is small enough to ignore, typically under 2 to 3 percent on sequential I/O. Thin provisioning adds more overhead than thick volumes because of the extra chunk allocation tracking, so use thick LVs for latency-sensitive database storage.
How do I recover a volume group after metadata corruption?
LVM keeps automatic text backups in /etc/lvm/backup and archives in /etc/lvm/archive. Use vgcfgrestore against the most recent good copy. This is exactly why that directory belongs in your backup rotation, not just the data volumes themselves.
Is LVM worth setting up on a small single-disk VPS?
Usually yes, even on one disk. It costs almost nothing at setup time and it means you can resize partitions later without rebuilding the box, which matters more on a VPS where reprovisioning is a hassle.
What is the difference between thick and thin LVM provisioning?
Thick volumes reserve their full size immediately in the VG. Thin volumes only consume space as data is actually written, which lets you overprovision, but it means you must actively monitor usage or every thin LV in the pool can run out of room at once.
Why doesn't my volume group show up after a reboot?
Nine times out of ten it is an activation problem, not a data-loss problem. Run vgscan to have LVM rescan attached disks and rebuild its cache, then vgchange -ay to activate whatever it finds. If that brings the VG back, check /etc/lvm/lvm.conf for a device filter that is excluding the disk, and on RHEL/Rocky/Fedora check that rd.lvm.lv= parameters are correct in the kernel command line if you are booting from an LV directly.
Conclusion
LVM is not exciting, and that is the point. Once it is set up correctly, most teams never think about it again until the day a disk runs low, and that day goes from a routine ticket to a weekend outage depending entirely on whether the volume manager was there from the start.
Rocky Linux and RHEL installers still default to LVM on top of xfs, and that has not changed in years, as you will see the moment you step through our Rocky Linux 10 installation walkthrough. Ubuntu leaves it optional at install time, which is exactly why so many production Ubuntu boxes end up without it and pay for that decision later.
Newer filesystems like Btrfs and ZFS fold volume management and snapshots into one layer, and that convergence is real, but LVM's advantage is that it works underneath any filesystem you already trust, which matters a lot when the filesystem itself is not up for debate.
If you are setting up a new server today, put LVM under the data partitions even if you never plan to resize anything, because that plan rarely survives contact with real growth. Pair this with our RHEL vs Ubuntu server comparison and Linux system administration guide for the next steps, and go run the validation script from Section 07 on your own servers today.
From your first terminal command to advanced sysadmin skills, every guide here is written in plain English with real examples you can run right now.





2 replies on “How LVM Works in Linux”
i think i will disable it i had a look at its .conf once goes on for miles
Fortunately, you rarely need to edit .conf. Was there a particular part of it that seemed confusing?