
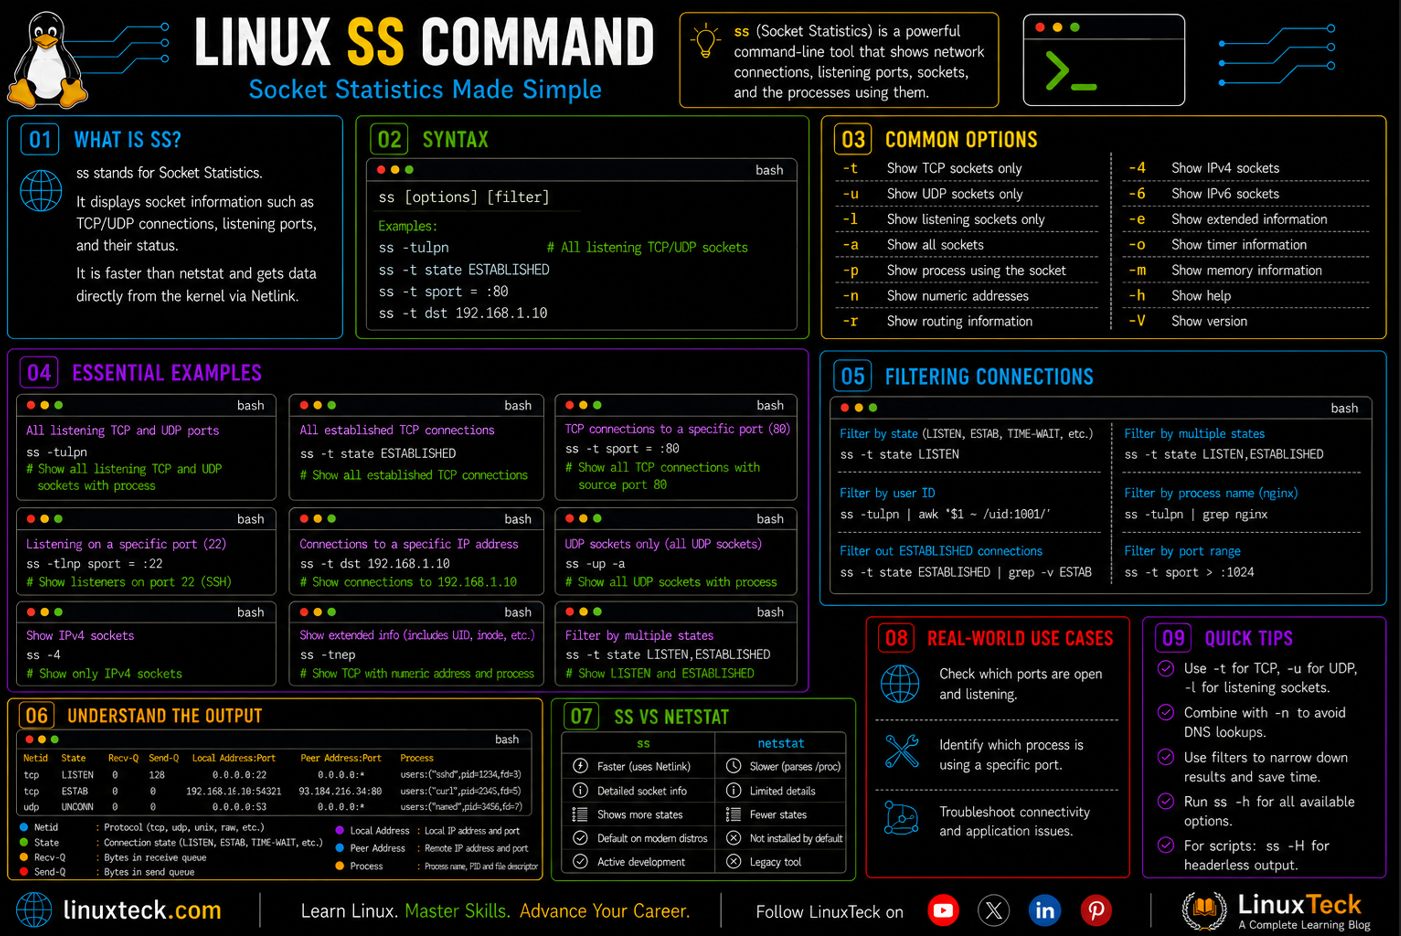
The ss command (Socket Statistics)in Linux is the modern Linux utility for viewing network sockets, active connections, listening ports, and the processes using them. Whether you're troubleshooting a service that won't start, checking open ports, or diagnosing network connectivity issues, ss provides the information quickly and efficiently. It has replaced netstat as the preferred socket inspection tool on most modern Linux distributions.
In this guide, you'll learn how to use the ss command through practical examples, understand its syntax and commonly used options, filter connections by protocol or port, identify which process owns a socket, and troubleshoot common networking problems with confidence.
Note:
If you're still getting comfortable with the terminal in general, it helps to have the basics down first. Our linux commands for beginners guide covers the fundamentals this article builds on.
Examples
What Is the ss Command in Linux?
ss stands for socket statistics. It shows you every socket your system currently has open, whether that's a TCP connection to a remote server, a UDP port waiting for traffic, or a local Unix domain socket that two processes on the same machine are using to talk to each other.
Under the hood, ss reads socket information straight from the kernel through netlink, instead of parsing /proc/net files line by line the way older tools did. That's the main reason it's noticeably faster on machines with thousands of connections, which matters a lot more than it sounds like once you're debugging a busy production box instead of your laptop.
Think of it as the tool you reach for the moment someone says "is anything listening on port 8080" or "why can't this server reach the database." It answers both in one line.
ss Command Syntax
The basic shape of the command is:
LinuxTeck.com
The options control what kind of sockets you see and how much detail comes with them, things like -t for TCP, -u for UDP, -l for listening only. The FILTER part is optional and lets you narrow results down to a specific host, port, or connection state, so instead of scrolling through two hundred lines you can ask for exactly the ones you care about.
Note:
Run ss with no options at all and it only shows established, non-listening INET and Unix sockets. A lot of people expect it to show everything by default, then wonder why their listening web server doesn't show up. You need -a or -l for that.
ss Command Options You'll Actually Use
| Flag | What It Does | When to Use It |
|---|---|---|
| -t | Show TCP sockets only | Checking web servers, APIs, anything connection based |
| -u | Show UDP sockets only | DNS, DHCP, streaming, or anything connectionless |
| -l | Show listening sockets only | Confirming a service actually bound to its port |
| -a | Show listening and non-listening sockets together | Getting the full picture instead of a partial one |
| -n | Skip service name resolution, show raw numbers | Speeding up output on servers with slow DNS |
| -p | Show the process and PID using each socket | Finding exactly which service owns a port |
| -r | Resolve numeric addresses and ports to names | Reading output as hostnames instead of raw IPs |
| -s | Print summary statistics instead of a full list | Getting a quick health check on a busy server |
| -o | Show timer information for each connection | Debugging why a connection hasn't timed out yet |
| -x | Show Unix domain sockets | Checking local sockets like MySQL or PHP-FPM |
| -4 / -6 | Limit output to IPv4 or IPv6 only | Isolating one stack when both are configured |
ss Command Examples
I. List All Listening TCP and UDP Ports
This is usually the first thing you run on a new server, just to see what's actually facing the network.
LinuxTeck.com
udp UNCONN 0 0 0.0.0.0:68 0.0.0.0:*
tcp LISTEN 0 128 0.0.0.0:22 0.0.0.0:*
tcp LISTEN 0 511 0.0.0.0:80 0.0.0.0:*
tcp LISTEN 0 128 127.0.0.1:3306 0.0.0.0:*
II. Show Every TCP Socket, Not Just Listening Ones
Drop -l and add -a and you get the full TCP picture, including connections already established with other machines.
LinuxTeck.com
LISTEN 0 128 0.0.0.0:22 0.0.0.0:*
ESTAB 0 0 192.168.1.20:22 192.168.1.5:52344
TIME-WAIT 0 0 192.168.1.20:80 203.0.113.9:41102
III. Check UDP Sockets on Their Own
Handy when you're chasing DNS or DHCP behaviour and don't want TCP noise mixed in.
LinuxTeck.com
UNCONN 0 0 0.0.0.0:68 0.0.0.0:*
UNCONN 0 0 0.0.0.0:123 0.0.0.0:*
IV. Show Only Listening Sockets, Regardless of Protocol
If you just care about what's open to accept new connections, this cuts everything else out.
LinuxTeck.com
tcp LISTEN 0 128 0.0.0.0:22 0.0.0.0:*
tcp LISTEN 0 511 0.0.0.0:80 0.0.0.0:*
V. Filter Down to Only Established Connections
This is where the state filter earns its keep. You skip the listening sockets entirely and only see live, active conversations.
LinuxTeck.com
ESTAB 0 0 192.168.1.20:22 192.168.1.5:52344
VI. Find Which Process Owns a Listening Port
This is the one you'll use constantly during troubleshooting, when a deployment fails because a port is "already in use."
LinuxTeck.com
LISTEN 0 128 0.0.0.0:22 0.0.0.0:* users:(("sshd",pid=812,fd=3))
LISTEN 0 511 0.0.0.0:80 0.0.0.0:* users:(("nginx",pid=1904,fd=6))
Tip:
If you're chasing a port that's held by an unexpected process during an incident, pair this with our ps command guide to confirm exactly what that PID is doing before you kill anything.
VII. Filter by Port Using an Expression
Instead of piping through grep, ss lets you write the filter directly, which is faster and won't accidentally match the wrong line.
LinuxTeck.com
tcp ESTAB 0 0 192.168.1.20:22 192.168.1.5:52344 timer:(keepalive,42sec,0)
VIII. Get a Quick Socket Summary Instead of a Full List
On a busy box with thousands of sockets, scrolling through a full dump isn't useful. This gives you the numbers instead.
LinuxTeck.com
TCP: 88 (estab 21, closed 40, orphaned 0, timewait 40)
Transport Total IP IPv6
RAW 0 0 0
UDP 12 9 3
TCP 48 41 7
INET 60 50 10
FRAG 0 0 0
IX. Check What a Specific Remote Host Is Connected To
Useful when a monitoring alert says a server is talking to something unexpected and you need to confirm which local socket is involved.
LinuxTeck.com
ESTAB 0 0 192.168.1.20:80 203.0.113.9:41102
X. List Local Unix Domain Sockets
A lot of local services, PHP-FPM and MySQL among them, talk over Unix sockets instead of network ports. This is how you check those.
LinuxTeck.com
u_str LISTEN 0 128 /run/mysqld/mysqld.sock
u_str LISTEN 0 100 /run/php/php8.2-fpm.sock
XI. Combine Filters to Isolate a Single Service Cleanly
Once you're comfortable with expressions, you can skip grep entirely and let ss narrow the list itself, port and protocol in one shot.
LinuxTeck.com
ESTAB 0 0 192.168.1.20:443 198.51.100.7:54210
XII. The Mistake: Running ss -tlnp Without Root and Assuming the Output Is Complete
This one catches almost everyone at least once. Without root privileges, ss will still run, but it silently hides process information for sockets you don't own.
LinuxTeck.com
LISTEN 0 128 0.0.0.0:22 0.0.0.0:*
LISTEN 0 511 0.0.0.0:80 0.0.0.0:*
Warning:
Notice the Process column is empty above. It looks like ss can't find the process, but it actually can, it's just not showing it to a non-root user. Rerun the exact same command with sudo and the process names and PIDs appear immediately. Don't waste time assuming the service isn't running just because the plain output looks blank there.
LinuxTeck.com
LISTEN 0 128 0.0.0.0:22 0.0.0.0:* users:(("sshd",pid=812,fd=3))
LISTEN 0 511 0.0.0.0:80 0.0.0.0:* users:(("nginx",pid=1904,fd=6))
Why the ss Command Matters
Without a tool like this, diagnosing a "connection refused" error turns into guesswork. You end up restarting services blind, hoping something fixes itself, instead of confirming in two seconds whether the port is even bound. ss turns a vague symptom into a specific, checkable fact.
It also matters because it scales. On a server handling real traffic with thousands of connections cycling through TIME-WAIT and ESTABLISHED states, an older tool crawling through /proc/net line by line can visibly lag, while ss reads the same data from the kernel almost instantly. For anyone doing server hardening work or auditing what's exposed, that speed difference is the reason ss became the default socket-diagnostic tool documented at man7.org instead of its predecessor.
Key Points
- Run ss with no flags and you only see established connections, add -a or -l to see listening sockets too.
- Use sudo with -p any time you need process names attached to sockets, without it the column shows blank even for services that are running fine.
- Filter with state ESTABLISHED or a dport/sport expression instead of piping to grep, it's faster and won't false match on IPs that contain the same digits as a port.
- Reach for ss -s first when a server feels slow or overloaded, it gives you totals before you scroll through hundreds of individual socket lines.
- Check Unix domain sockets with -x when a local service like MySQL or PHP-FPM isn't responding, the problem is often there rather than on a network port.
- Add -n whenever you want raw numeric output instead of waiting on service or hostname resolution, especially over a slow connection.
Frequently Asked Questions
Why does ss -tlnp show empty process names even though something is clearly listening?
That's almost always a permissions issue, not a bug. Run it with sudo and the Process column fills in immediately.
What's the difference between ss and netstat, and should I stop using netstat?
ss reads socket data straight from the kernel through netlink, while netstat parses /proc/net files, which is slower on busy systems. Netstat still works fine on most distros, but a lot of minimal images and containers don't ship it at all anymore, so it's worth being fluent in ss regardless.
How do I check only IPv4 sockets and ignore IPv6 entirely?
Add -4 to any command, so ss -tln4 shows listening TCP sockets on IPv4 only. Swap in -6 if you need the opposite.
Can I filter ss output by a specific port instead of grepping through everything?
Yes, that's what the built in expressions are for. Something like ss -tn sport = :443 does it directly without piping to grep at all.
Why does ss -s show more sockets than what I actually see in the regular output?
The summary counts sockets across every state and protocol, including ones you'd normally have to add -a to see. It's giving you the full total, not just what the default view shows.
How do I close a stuck socket instead of just looking at it?
Newer versions support -K to forcibly close matching sockets, for IPv4 and IPv6 connections. It needs Linux kernel 4.5 or newer with the CONFIG_INET_DIAG_DESTROY option enabled, so on older enterprise distros or hardened kernels without that module it will silently fail to close anything. Use it carefully too, it's a blunt tool and closing the wrong socket can drop a live connection you actually needed.
From your first terminal command to advanced sysadmin skills, every guide here is written in plain English with real examples you can run right now. Check out our linux network command cheat sheet, our networking commands guide, and our firewall-cmd guide for more on keeping a server's network layer under control. If SSH access itself is part of what you're troubleshooting, our ssh client commands and ssh troubleshooting guide cover that side in depth, and this monitoring cheat sheet rounds out the toolkit for anything ss doesn't cover on its own.